Difference between revisions of "Manual:Timer Engine"
(Added categories) |
|||
| Line 1: | Line 1: | ||
| − | = | + | =Timer Engine= |
Mudlet supports 4 different sorts of timers: | Mudlet supports 4 different sorts of timers: | ||
Revision as of 03:34, 28 July 2012
Timer Engine
Mudlet supports 4 different sorts of timers:
Regular GUI Timers
- Regular GUI Timers that fire repeatedly in a certain interval specified by the user. To make one, go to the Timers section (1) in Mudlet, click Add (2), select the time periods you'd like the timer to be going off at - save (3) and activate it (4). The timer will go off after your specified interval and then at regular specified intervals after that, until disabled.
Offset Timers
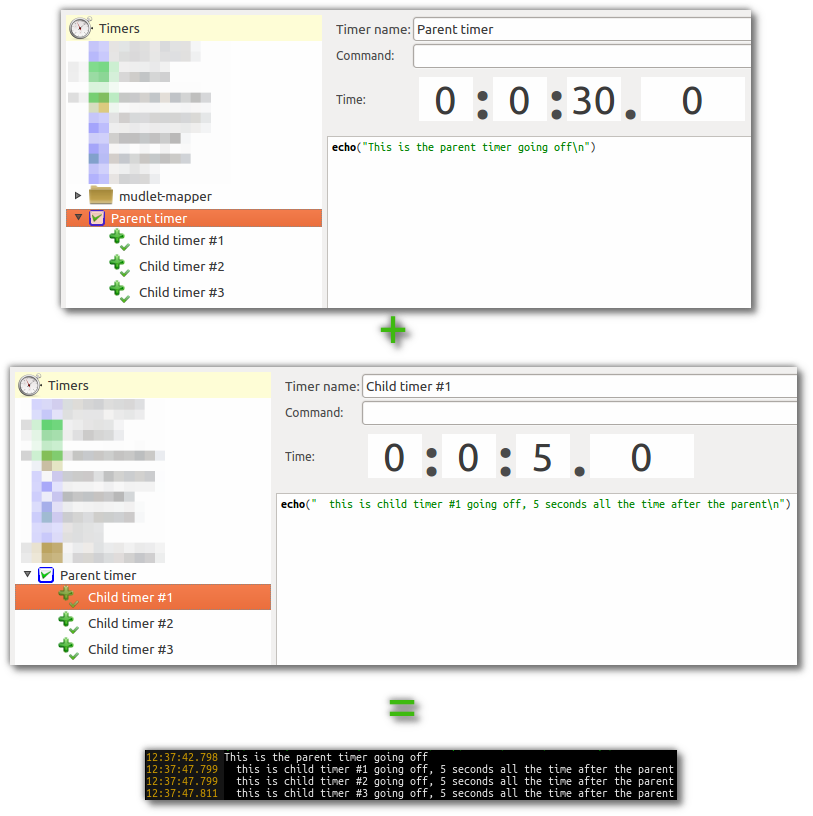
- Offset Timers are child timers of a parent timer and fire a single shot after a specified timeout after their parent fired its respective timeout. This interval is an offset to the interval of its parent timer. To make them, add a regular GUI timer (see above), then create another timer and drag it onto the timer. This will make the timer that is "inside" the timer (the child inside the parent) go off at a certain time after it's parent goes off. Offset timers differ visually from regular timers and are represented with a + icon for offset. Offset timers can be turned on and off by the user just like any other timer. For example - a parent timer fires every 30 seconds and by doing so kicks off 3 offset timers with an offset of 5 seconds each. Consequently, the 3 children fire 5 seconds after each time the parent timer fired. To make this happen, make the parent timer tic every 30 seconds, drag 3 timers into it with an offset of 5s on each:
Temporary Timers
- Temporary Timers are very useful, and are the most common type of timer used for scripting purposes. They behave like regular timers, but they are one shot only timers.
Batch Job Timers
- Batch Job Timers are a form of timer that issue a sequence of commands/scripts according to a certain timeout instead of a single command/script. This is a very important tool if the sequence of commands is important. Timers depend largely on the operating system you are using and it cannot be guaranteed under certain conditions that if you have set up 5 timers to fire after 1.3 seconds that the sequence in which they fire is the same sequence in which they were created. If the sequence of commands is important, you should always use batch job timers as this form of timers guarantees that the sequence of commands is observed. For example: If you want to make an auto-miner bot that digs its way into a gold mine digging left, down, down, right, left, down until a trigger catches a message that indicates that the mine is going to collapse and bury your poor soul unless you run for your life and head out of the mine. In this scenario the sequence of commands is vital as you’d lose your way and die. This is a classical case for a batch job timer.
Uses and examples
The most common usage of temporary timers is the function tempTimer(). It lets you specify a timeout after which a script is being run e.g. <lua> tempTimer( 0.3, send("kill rat") ) </lua>
This will issue the command "kill rat" after 0.3 seconds. Other clients call this kind of function wait() or doAfter() etc. It is one of the most used functions in MUD scripting. tempTimer() is a single shot timer. It will only fire once and is then marked for deletion. TempTriggers(), by contrast, live through the entire session and are never deleted unless you explicitly delete them or disable them.
Another often used function in the context of timers is enableTimer( timerName ), or disableTimer( timerName ). Those are the counterparts of enableTrigger( triggerName ) and disableTrigger( triggerName ), enableKey( keyName ) etc..
![]() Note: Temporary timers cannot be accessed from the GUI and are not saved in profiles.
Note: Temporary timers cannot be accessed from the GUI and are not saved in profiles.
To be continued…

