Difference between revisions of "Compiling Mudlet"
| Line 210: | Line 210: | ||
'''1. Download Mudlet source code''' | '''1. Download Mudlet source code''' | ||
| − | |||
# Install [https://desktop.github.com/ Github Desktop]. | # Install [https://desktop.github.com/ Github Desktop]. | ||
| − | # [https://help.github.com/desktop/guides/contributing-to-projects/cloning-a-repository-from-github-to-github-desktop/#platform-windows | + | # Clone ([https://help.github.com/desktop/guides/contributing-to-projects/cloning-a-repository-from-github-to-github-desktop/#platform-windows instructions]) Mudlet's [https://github.com/mudlet/mudlet repository]. |
Revision as of 05:50, 29 May 2018
Key contributing information
Clang format is used to automatically format code submissions using the src/.clang-format style. See here how to enable clang-format with Qt Creator - and make sure to specify the 'File' option for the configuration style.
Branches:
development is the development branch where new features can go.
Workflow:
Fork and submit a PR with your changes (Github tutorial).
![]() Note:
Note:
if you've previously compiled Mudlet -src/src.prohas been renamed tosrc/mudlet.proin Mudlet 3.3.
Continuous Integration
Mudlet is hosted on Github it uses Travis and AppVeyor for continuous integration by building on a Ubuntu 14.04 LTS Linux and a macOS 10.11 platforms (Travis) and a Visual Studios 2015 on a MicroSoft Windows Server 2012 R2 platform (AppVeyor) repectively. This means that every push to the Git repository is test compiled on Linux (Ubuntu), Mac OSX and Microsoft Windows.
Travis integration is defined in a .travis.yml file and AppVeyor integration by .appveyor.yml file, in our case, they reference shell/PowerShell scripts in the CI directory, which handle things like installing dependencies and building mudlet.
![]() Note:
Note:
Travis builds do not currently package mudlet, so not everything is automated.
Compiling
Compiling on Ubuntu
These instructions will get you setup compiling on Ubuntu. Need a hand? Discord, Join us on Gitter (need a Github account), or forums.
1. Ubuntu 16.04 setup
If you're on Ubuntu 16.04 (Xenial Xerus), install the following. If you're on a newer Ubuntu, skip this step and go to 2. Install dependencies.
 sudo add-apt-repository ppa:beineri/opt-qt58-xenial
 sudo apt update
 sudo apt install qt58-meta-full qt58creator
 source /opt/qt58/bin/qt58-env.sh
2. Install dependencies
sudo apt install git build-essential qt5-default qtmultimedia5-dev qttools5-dev \
  libhunspell-dev lua5.1 liblua5.1-0-dev libpcre3-dev libboost-dev zlib1g-dev cmake \
  libhunspell-dev lua-rex-pcre lua-sql-sqlite3 lua-filesystem lua-zip libyajl-dev \
  libzip-dev libgstreamer0.10-0 libglu1-mesa-dev ccache libpugixml-dev \
  mesa-common-dev qtcreator libpulse-dev libglib2.0-dev luarocks libboost-all-dev
sudo apt install gstreamer0.10-fluendo-mp3 # may not work on newer Ubuntu
sudo luarocks install luautf8
3. Get Mudlet source
git clone --recursive https://github.com/Mudlet/Mudlet.git mudlet
4. Create a build directory
 cd mudlet
 mkdir build
 cd build
5. Run the following commands, depending on which build system you want to use
EITHER:
cmake ..
OR:
qmake CONFIG+=debug ../src/mudlet.pro
THEN:
make -j `nproc`
5. Start the application you have just compiled - enjoy
cd src
./mudlet
Compiling on macOS
These instructions will get you setup compiling on macOS. Need a hand? Join us on Gitter (need a Github account), Discord server or forums otherwise.
1. Install prerequisites
Install XCode, command line tools for XCode, HomeBrew and CocoaPods (we'll need packages from both).
Once everything is installed, do:
 brew doctor
 brew update
 brew install git
2. Get Mudlet source
git clone --recursive https://github.com/Mudlet/Mudlet.git mudlet
3. Go to the parent of the mudlet "src" folder and create (if necessary) a build subdirectory (this is so that we can build out of source which keeps the source code clean}
mkdir build
3. Setup your environment you only need the first three lines if your system cannot find the right Qt libraries or tools, the added directories might be different if you have installed them differently
 export PATH="/usr/local/opt/qt5/bin:$PATH"
 export LDFLAGS=" -L/usr/local/opt/qt5/lib ${LDFLAGS}"
 export CPPFLAGS=" -I/usr/local/opt/qt5/include ${CPPFLAGS}"
 CI/travis.osx.before_install.sh
 CI/travis.osx.install.sh
 sudo luarocks-5.1 install lrexlib-pcre
 sudo luarocks-5.1 install luasql-sqlite3
 sudo luarocks-5.1 install luautf8
4. Go to the mudlet build folder
cd build
5. Run the following commands, depending on which build system you want to use (qmake IS recommended for Linux and Mac platforms)
EITHER:
qmake ../src/mudlet.pro
OR:
cmake ..
THEN:
make -j `sysctl -n hw.ncpu`
6. Enjoy
The Mudlet.app is now available in src/ for launching.
Compiling on Debian 'Sid'
1. Install required packages from main repo.
sudo apt-get install build-essential git liblua5.1-dev zlib1g-dev libhunspell-dev libpcre3-dev \
libzip-dev libboost-dev libyajl-dev libpulse-dev lua-rex-pcre lua-filesystem lua-zip \
lua-sql-sqlite3 qt5-default qtmultimedia5-dev qttools5-dev luarocks ccache libpugixml-dev
sudo luarocks install luautf8
2. Grab latest Mudlet source.
mkdir ~/projects && cd ~/projects && git clone --recursive https://github.com/Mudlet/Mudlet.git mudlet
3. Build Mudlet.
cd ~/projects/mudlet/src
qmake
make
sudo make install
Compiling on Debian 9 'Stretch'
1. Install required packages.
sudo apt-get install build-essential git liblua5.1-dev zlib1g-dev libhunspell-dev libpcre3-dev \
libzip-dev libboost-dev libyajl-dev libpulse-dev lua-rex-pcre lua-filesystem lua-zip \
lua-sql-sqlite3 qt5-default qtmultimedia5-dev qttools5-dev luarocks ccache libpugixml-dev
sudo luarocks install luautf8
2. Get Mudlet source.
mkdir ~/source && cd ~/source
git clone --recursive https://github.com/Mudlet/Mudlet.git mudlet
Note: the line above will check out `development` branch source code, and this might not always be stable. You can check out the latest release source code using this command:
git clone --recursive --branch master https://github.com/Mudlet/Mudlet.git mudlet
3. Build Mudlet.
mkdir ~/source/mudlet/build && cd ~/source/mudlet/build
qmake ../src/mudlet.pro
make -j `nproc`
sudo make install
After these steps you can run Mudlet by typing:
mudlet
Compiling on ArchLinux
The best way to do this would be to use the PKGBUILD found here. You'll just download the PKGBUILD into a directory, run
makepkg
sudo pacman -U [name of the generated pkg file]
and you'll be done. For more info on what this does, visit this site.
Compiling on Gentoo
An overlay containing Mudlet is available for compiling Mudlet on Gentoo.
Compiling on Windows 7+
These instructions will get you setup compiling on Windows.
Need a hand? Join us on the Discord server, Gitter, or forums.
1. Download Mudlet source code
- Install Github Desktop.
- Clone (instructions) Mudlet's repository.
Building Mudlet from QtCreator
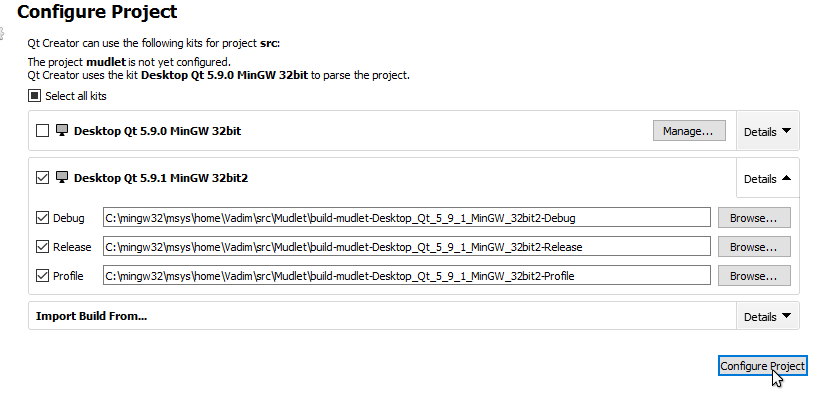
Open C:\mingw32\msys\home\<username>\src\Mudlet\src\mudlet.pro in Qt Creator, enable Debug and Release builds and hit Configure Project:
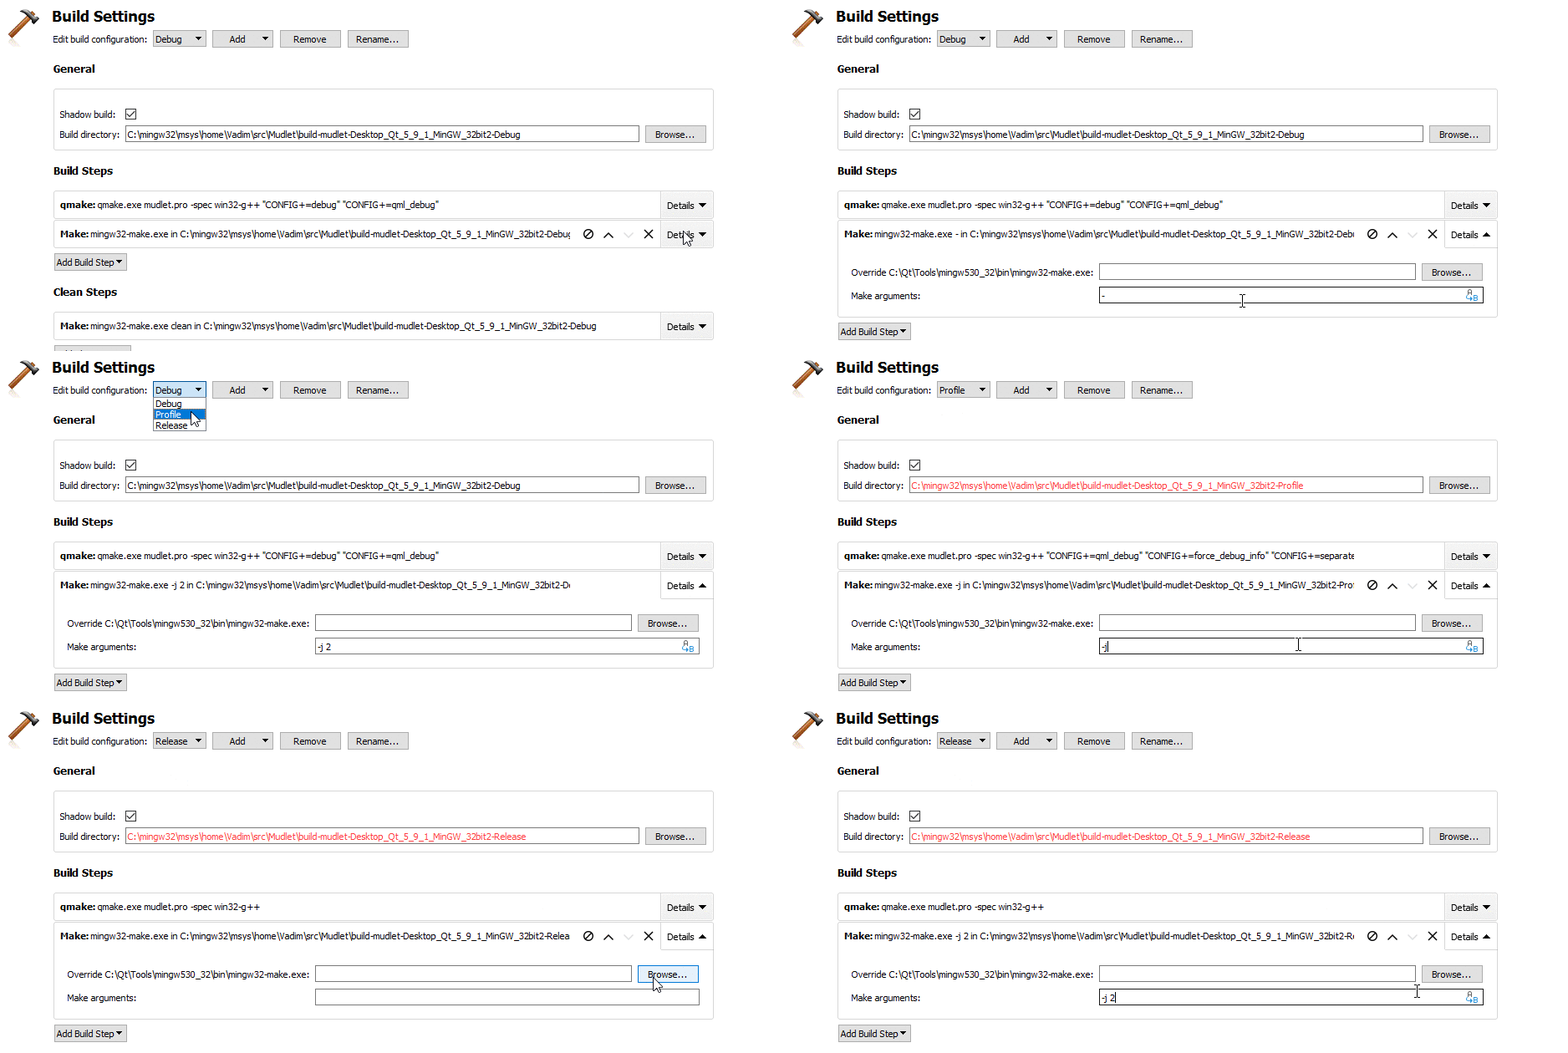
Press Ctrl+5 and update project settings for the # of cores/threads available to your system:
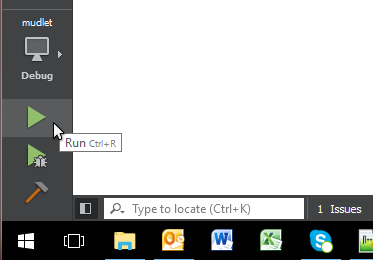
Hit run:
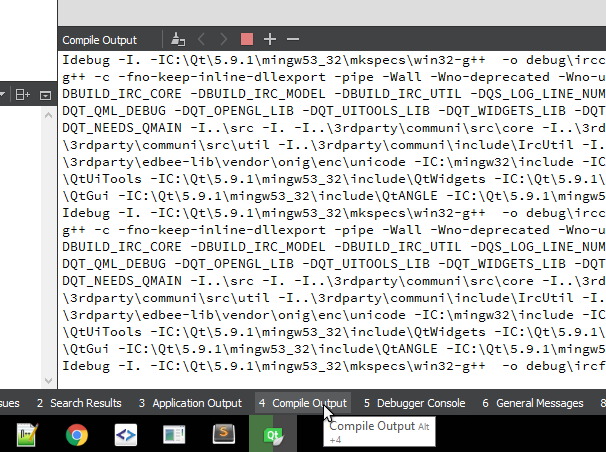
Click on Compile Output to see progress on compiling:
This'll take ~10min, after which Mudlet will launch! But it's not completely ready yet - close it and follow more:
4.Copy Needed DLLs
Copy the following dll's needed to run Mudlet: See above note about alternative install paths before copying.
cd ~/src/Mudlet/build-mudlet-Desktop_Qt_5_9_1_MinGW_32bit-Debug/debug
cp /c/Qt/5.9.1/mingw53_32/bin/Qt5Cored.dll .
cp /c/Qt/5.9.1/mingw53_32/bin/Qt5Guid.dll .
cp /c/Qt/5.9.1/mingw53_32/bin/libEGLd.dll .
cp /c/Qt/5.9.1/mingw53_32/bin/libGLESv2d.dll .
cp /c/Qt/5.9.1/mingw53_32/bin/Qt5Networkd.dll .
cp /c/Qt/5.9.1/mingw53_32/bin/Qt5OpenGLd.dll .
cp /c/Qt/5.9.1/mingw53_32/bin/Qt5Widgetsd.dll .
cp /c/Qt/5.9.1/mingw53_32/bin/Qt5Multimediad.dll .
cp /c/Qt/5.9.1/mingw53_32/bin/Qt5Gamepadd.dll .
cp /c/Qt/5.9.1/mingw53_32/bin/libgcc_s_dw2-1.dll .
cp /c/Qt/5.9.1/mingw53_32/bin/libstdc++-6.dll .
cp /c/Qt/5.9.1/mingw53_32/bin/libwinpthread-1.dll .
cp /c/mingw32/lib/libyajl.dll .
cp $HOME/src/lua-5.1.5/src/lua51.dll .
cp $HOME/src/lua-5.1.5/src/lua51.dll /c/mingw32/bin
cp $HOME/src/openssl-1.0.2k/libeay32.dll .
cp $HOME/src/openssl-1.0.2k/ssleay32.dll .
cp /c/mingw32/bin/libzip-2.dll .
cp /c/mingw32/bin/libhunspell-1.4-0.dll .
cp /c/mingw32/bin/libpcre-1.dll .
cp /c/mingw32/bin/libsqlite3-0.dll .
cp /c/mingw32/bin/zlib1.dll .
cp ~/src/Mudlet/src/*.dic .
cp -r /c/Qt/5.9.1/mingw53_32/plugins/audio .
cp -r /c/Qt/5.9.1/mingw53_32/plugins/mediaservice .
cp -r /c/Qt/5.9.1/mingw53_32/plugins/platforms .
cp -r /c/Qt/5.9.1/mingw53_32/plugins/imageformats .
mkdir ~/src/Mudlet/build-mudlet-Desktop_Qt_5_9_1_MinGW_32bit-Release/release
cd ~/src/Mudlet/build-mudlet-Desktop_Qt_5_9_1_MinGW_32bit-Release/release
cp /c/Qt/5.9.1/mingw53_32/bin/Qt5Core.dll .
cp /c/Qt/5.9.1/mingw53_32/bin/Qt5Gui.dll .
cp /c/Qt/5.9.1/mingw53_32/bin/libEGL.dll .
cp /c/Qt/5.9.1/mingw53_32/bin/libGLESv2.dll .
cp /c/Qt/5.9.1/mingw53_32/bin/Qt5Network.dll .
cp /c/Qt/5.9.1/mingw53_32/bin/Qt5OpenGL.dll .
cp /c/Qt/5.9.1/mingw53_32/bin/Qt5Widgets.dll .
cp /c/Qt/5.9.1/mingw53_32/bin/Qt5Multimedia.dll .
cp /c/Qt/5.9.1/mingw53_32/bin/Qt5Gamepad.dll .
cp /c/Qt/5.9.1/mingw53_32/bin/libgcc_s_dw2-1.dll .
cp /c/Qt/5.9.1/mingw53_32/bin/libstdc++-6.dll .
cp /c/Qt/5.9.1/mingw53_32/bin/libwinpthread-1.dll .
cp /c/mingw32/lib/libyajl.dll .
cp $HOME/src/lua-5.1.5/src/lua51.dll .
cp $HOME/src/lua-5.1.5/src/lua51.dll /c/mingw32/bin
cp $HOME/src/openssl-1.0.2k/libeay32.dll .
cp $HOME/src/openssl-1.0.2k/ssleay32.dll .
cp /c/mingw32/bin/libzip-2.dll .
cp /c/mingw32/bin/libhunspell-1.4-0.dll .
cp /c/mingw32/bin/libpcre-1.dll .
cp /c/mingw32/bin/libsqlite3-0.dll .
cp /c/mingw32/bin/zlib1.dll .
cp ~/src/Mudlet/src/*.dic .
cp -r /c/Qt/5.9.1/mingw53_32/plugins/audio .
cp -r /c/Qt/5.9.1/mingw53_32/plugins/mediaservice .
cp -r /c/Qt/5.9.1/mingw53_32/plugins/platforms .
cp -r /c/Qt/5.9.1/mingw53_32/plugins/imageformats .
5.Setting up Lua libraries
At this point your Lua install will be bare-bones and lacking the Lua libraries Mudlet uses.
cd ~/src
wget --no-check-certificate http://keplerproject.github.io/luarocks/releases/luarocks-2.4.0-win32.zip
unzip luarocks-2.4.0-win32.zip
Open up the Windows command line cmd to install Luarocks:
cd C:\mingw32\msys\home\%USERNAME%\src\luarocks-2.4.0-win32
install.bat /P C:\LuaRocks /MW
Wait for the installation to finish. Then:
cd \LuaRocks\lua\luarocks
powershell -Command "(gc cfg.lua) -replace 'mingw32-gcc', 'gcc' | Out-File -encoding ASCII cfg.lua"
cd \LuaRocks
luarocks install LuaFileSystem
luarocks install LuaSQL-SQLite3 SQLITE_INCDIR="c:\mingw32\include" SQLITE_LIBDIR="c:\mingw32\lib"
luarocks install lrexlib-pcre PCRE_LIBDIR="c:\mingw32\lib" PCRE_INCDIR="c:\mingw32\include"
luarocks install luautf8
Back in the msys command line:
cd ~/src
wget --no-check-certificate https://github.com/rjpcomputing/luazip/archive/master.zip
unzip master
cd luazip-master/
gcc -O2 -c -o src/luazip.o -IC:/mingw32/include/ src/luazip.c
gcc -shared -o zip.dll src/luazip.o -Lc:/mingw32/lib -lzzip -lz c:/mingw32/bin/lua51.dll -lm
cp zip.dll ~/src/Mudlet/build-mudlet-Desktop_Qt_5_9_1_MinGW_32bit-Debug/debug
cp zip.dll ~/src/Mudlet/build-mudlet-Desktop_Qt_5_9_1_MinGW_32bit-Release/release
cp -r /c/mingw32/lib/lua/5.1/* ~/src/Mudlet/build-mudlet-Desktop_Qt_5_9_1_MinGW_32bit-Debug/debug
cp -r /c/mingw32/lib/lua/5.1/* ~/src/Mudlet/build-mudlet-Desktop_Qt_5_9_1_MinGW_32bit-Release/release
cp -r ~/src/Mudlet/src/mudlet-lua/ ~/src/Mudlet/build-mudlet-Desktop_Qt_5_9_1_MinGW_32bit-Debug
cp -r ~/src/Mudlet/src/mudlet-lua/ ~/src/Mudlet/build-mudlet-Desktop_Qt_5_9_1_MinGW_32bit-Release
You're done! Press the green Run button again in Qt Creator (bottom-right) and a Mudlet window should come up without any errors.
Uninstalling
To uninstall, remove the following folders:
C:\LuaRocks
C:\mingw32
C:\Qt
Setting up IDEs
CLion
If you'd like to use CLion and it is giving the following error:
    By not providing "FindQt5Core.cmake" in CMAKE_MODULE_PATH this project has
    asked CMake to find a package configuration file provided by "Qt5Core", but
    CMake did not find one.

    Could not find a package configuration file provided by "Qt5Core" with any
    of the following names:

    Qt5CoreConfig.cmake
    qt5core-config.cmake

    Add the installation prefix of "Qt5Core" to CMAKE_PREFIX_PATH or set
    "Qt5Core_DIR" to a directory containing one of the above files.  If
    "Qt5Core" provides a separate development package or SDK, be sure it has
    been installed.
You can fix this by setting -DCMAKE_PREFIX_PATH=<your Qt + version + compiler location>. For example: -DCMAKE_PREFIX_PATH=/home/vadi/Programs/Qt/5.9/gcc_64/
