Difference between revisions of "Manual:Connection Window"
| (11 intermediate revisions by the same user not shown) | |||
| Line 4: | Line 4: | ||
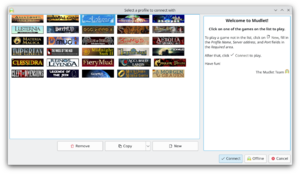
The connection dialog is the first screen you will be greeted with when starting Mudlet. This window is how you set up your initial connection parameters and begin connecting to your game. | The connection dialog is the first screen you will be greeted with when starting Mudlet. This window is how you set up your initial connection parameters and begin connecting to your game. | ||
| + | |||
| + | [[File:Main-connection-screen.png|thumb|center|Connection window showing pre-configured games]] | ||
{{note}} The first time Mudlet is run, some options cannot be edited until you create your first new profile or after you start your first game. | {{note}} The first time Mudlet is run, some options cannot be edited until you create your first new profile or after you start your first game. | ||
| − | + | == Pre-Configured Games == | |
| − | + | In the left of the window, you will notice a list of several MUD games. To play, select one from the list and click the "Connect" button. | |
| − | + | {{note}} Game admins: like to see your game added to Mudlet? Visit [[Listing Your MUD]]. | |
== New Connections == | == New Connections == | ||
| − | If you're using Mudlet with an unlisted game or for other telnet services, you'll want to click on the | + | If you're using Mudlet with an unlisted game or for other telnet services, you'll want to click on the '''New''' button then enter a name for the profile (perhaps your character or game name) in the '''Profile name''' section. Next enter your '''Server address''' and '''port''', these are typically listed on the game website. |
| − | |||
| − | |||
[[File:New-connection.png|thumb|center|Creating a new game connection]] | [[File:New-connection.png|thumb|center|Creating a new game connection]] | ||
| Line 23: | Line 23: | ||
{{note}} Connection parameters cannot be edited while a connection is in progress for a selected profile. | {{note}} Connection parameters cannot be edited while a connection is in progress for a selected profile. | ||
| + | To connect to a game securely (via [https://en.wikipedia.org/wiki/Transport_Layer_Security TLS] or SSL) tick the 'Secure' box in the profile connection settings: | ||
| − | + | [[File:Secure-connection.png|center]] | |
| − | + | {{note}} Game admins/developers: check out [[Sample_TLS_Configuration|our sample configuration]] page or this [https://blog.oestrich.org/2018/11/nginx-tls-socket example of a TLS proxy using nginx] for some examples on how to setup a secure connection for your game. | |
| − | + | == Automatic Login == | |
| − | + | If your game takes in the characters name first and password next, Mudlet can automatically login for you. To make use of this feature in the Options tab type your name and password into the relevant sections as seen below. | |
| − | + | [[File:Character autologin.png|thumb|center|Enter character name and password for automatic login]] | |
| − | + | All passwords by default are stored securely in the computers credential store - which means you can't just open up the file with the password and look at it. | |
| − | |||
[[File:Toggle password storage in profile or computer.png|thumb|center|Toggle password storage in profile or computer]] | [[File:Toggle password storage in profile or computer.png|thumb|center|Toggle password storage in profile or computer]] | ||
| − | + | When the password is stored securely on the computer, you can find it in the credential manager. | |
| − | + | <gallery mode="packed"> | |
| + | File:Passwords stored securely in Windows.png|Passwords stored securely in Windows | ||
| + | File:Passwords stored securely in Linux.png|Passwords stored securely in Linux | ||
| + | File:Passwords stored securely in macOS.png|Passwords stored securely in macOS | ||
| + | </gallery> | ||
| − | |||
| − | |||
| − | |||
| − | |||
| − | |||
| + | {{note}} The drawback of storing the password on the computer itself, however, is that if you use cloud sync for your profiles - the password won't the synchronised. You can go to Special Options in Mudlet's Preferences and change the password to be stored within the profile to make that work, if you'd like the password to be portable but visible in plaintext. | ||
== Discord Rich Presence == | == Discord Rich Presence == | ||
| Line 55: | Line 55: | ||
This feature can only be enabled on the pre-configured games which currently also support the feature. For more information, read about [[Standards:Discord_GMCP|Discord GMCP]] | This feature can only be enabled on the pre-configured games which currently also support the feature. For more information, read about [[Standards:Discord_GMCP|Discord GMCP]] | ||
| − | |||
| − | |||
| − | |||
| − | |||
[[Category:Mudlet Manual]] | [[Category:Mudlet Manual]] | ||
Latest revision as of 12:58, 29 July 2024
Connection Window
The connection dialog is the first screen you will be greeted with when starting Mudlet. This window is how you set up your initial connection parameters and begin connecting to your game.
![]() Note: The first time Mudlet is run, some options cannot be edited until you create your first new profile or after you start your first game.
Note: The first time Mudlet is run, some options cannot be edited until you create your first new profile or after you start your first game.
Pre-Configured Games
In the left of the window, you will notice a list of several MUD games. To play, select one from the list and click the "Connect" button.
![]() Note: Game admins: like to see your game added to Mudlet? Visit Listing Your MUD.
Note: Game admins: like to see your game added to Mudlet? Visit Listing Your MUD.
New Connections
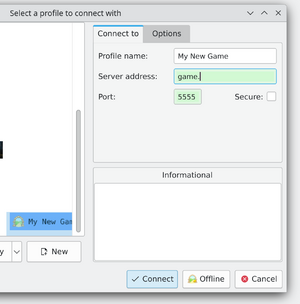
If you're using Mudlet with an unlisted game or for other telnet services, you'll want to click on the New button then enter a name for the profile (perhaps your character or game name) in the Profile name section. Next enter your Server address and port, these are typically listed on the game website.
![]() Note: Connection parameters cannot be edited while a connection is in progress for a selected profile.
Note: Connection parameters cannot be edited while a connection is in progress for a selected profile.
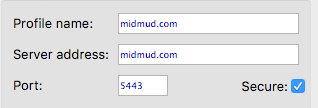
To connect to a game securely (via TLS or SSL) tick the 'Secure' box in the profile connection settings:
![]() Note: Game admins/developers: check out our sample configuration page or this example of a TLS proxy using nginx for some examples on how to setup a secure connection for your game.
Note: Game admins/developers: check out our sample configuration page or this example of a TLS proxy using nginx for some examples on how to setup a secure connection for your game.
Automatic Login
If your game takes in the characters name first and password next, Mudlet can automatically login for you. To make use of this feature in the Options tab type your name and password into the relevant sections as seen below.
All passwords by default are stored securely in the computers credential store - which means you can't just open up the file with the password and look at it.
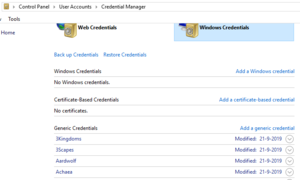
When the password is stored securely on the computer, you can find it in the credential manager.
![]() Note: The drawback of storing the password on the computer itself, however, is that if you use cloud sync for your profiles - the password won't the synchronised. You can go to Special Options in Mudlet's Preferences and change the password to be stored within the profile to make that work, if you'd like the password to be portable but visible in plaintext.
Note: The drawback of storing the password on the computer itself, however, is that if you use cloud sync for your profiles - the password won't the synchronised. You can go to Special Options in Mudlet's Preferences and change the password to be stored within the profile to make that work, if you'd like the password to be portable but visible in plaintext.
Discord Rich Presence
Since version 3.14 forward, Mudlet supports Discord Rich Presence integration for games using GMCP.
This feature can only be enabled on the pre-configured games which currently also support the feature. For more information, read about Discord GMCP


