Difference between revisions of "Compiling Mudlet"
(Remove Duplicate entries of dependencies for Ubuntu 20.10, and add a couple missing ones.) |
|||
| (108 intermediate revisions by 11 users not shown) | |||
| Line 5: | Line 5: | ||
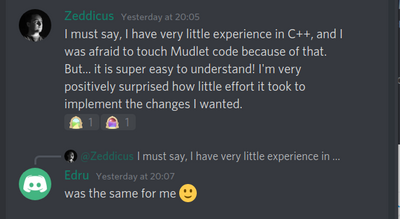
Otherwise, hop in for new adventure! | Otherwise, hop in for new adventure! | ||
| − | [[File:Easy Mudlet code understanding.png| | + | [[File:Easy Mudlet code understanding.png|400px|none]] |
| − | |||
| − | |||
| − | |||
| − | |||
| − | |||
| − | |||
| − | |||
| − | |||
| − | |||
| − | |||
| − | |||
| − | |||
| − | |||
| − | |||
| − | |||
= Compiling = | = Compiling = | ||
| Line 28: | Line 13: | ||
These instructions will get you setup compiling on Ubuntu. Need a hand? Join us on Mudlet's [https://discord.gg/BwgJpMj Discord] or [http://forums.mudlet.org/viewforum.php?f=7 forums]. | These instructions will get you setup compiling on Ubuntu. Need a hand? Join us on Mudlet's [https://discord.gg/BwgJpMj Discord] or [http://forums.mudlet.org/viewforum.php?f=7 forums]. | ||
| − | ===Ubuntu | + | ===Ubuntu 22.04 & later=== |
| − | Following instructions will work on Ubuntu | + | Following instructions will work on Ubuntu 22.04 as well as all its flavours and derivatives (such as KDE Neon, for example) |
| − | Important thing is to have ''Universe'' repository enabled in your package manager. | + | Important thing is to have ''Universe'' repository enabled in your package manager. (on Ubuntu you will have all the repositories that you need already enabled by default.) |
| + | |||
| + | '''1. necessary dependencies''' | ||
| − | |||
Majority of required dependencies can be obtained from repositories, and can be installed with following command: | Majority of required dependencies can be obtained from repositories, and can be installed with following command: | ||
| − | sudo apt install build-essential git | + | sudo apt install ubuntu-restricted-extras qtcreator build-essential git zlib1g-dev libhunspell-dev \ |
| + | libpcre3-dev libzip-dev libboost-dev libboost-all-dev libyajl-dev libpulse-dev libpugixml-dev \ | ||
| + | liblua5.1-0-dev lua-filesystem lua-zip lua-sql-sqlite3 luarocks ccache lua5.1 libsecret-1-dev \ | ||
| + | libglu1-mesa-dev mesa-common-dev libglib2.0-dev libgstreamer1.0-dev libqt5opengl5-dev cmake \ | ||
| + | qt6-multimedia-dev libqt6core5compat6 qt6-tools-dev qtkeychain-qt6-dev qt6-l10n-tools ninja-build \ | ||
| + | qt6-tools-dev-tools libqt6core5compat6-dev qttools5-dev qtmultimedia5-dev qt6-speech-dev | ||
| + | |||
| + | '''1.1 Ubuntu 24.04:''' | ||
| + | |||
| + | <code>sudo apt install qt6-multimedia-dev</code> | ||
| − | Few of required Lua modules are not available in official repositories, so they have to be installed using ''luarocks'' | + | Few of required Lua modules are not available in official repositories, so they have to be installed using ''luarocks'' |
sudo luarocks install lcf | sudo luarocks install lcf | ||
sudo luarocks install luautf8 | sudo luarocks install luautf8 | ||
sudo luarocks install lua-yajl | sudo luarocks install lua-yajl | ||
| + | sudo luarocks install lrexlib-pcre | ||
| + | |||
| + | '''2. obtaining the source code''' | ||
| + | |||
| + | Obtain the latest in-development code with: | ||
| + | git clone --recursive -b development https://github.com/Mudlet/Mudlet.git | ||
| + | mkdir Mudlet/build | ||
| + | cd Mudlet/build | ||
| − | + | '''3. compiling the code''' | |
| − | + | cmake .. -G Ninja | |
| − | + | ninja | |
| − | |||
| − | |||
| − | |||
| − | |||
| − | |||
| − | |||
| − | |||
| − | + | 4. '''installing compiled code''' | |
| − | |||
| − | |||
| − | |||
| − | |||
| − | |||
| − | |||
| − | |||
| − | |||
| − | |||
| − | |||
After successful code compilation, next few commands will install resulting binaries, desktop file for menus and appropriate icon. | After successful code compilation, next few commands will install resulting binaries, desktop file for menus and appropriate icon. | ||
sudo make install | sudo make install | ||
sudo cp ../mudlet.png /usr/share/pixmaps | sudo cp ../mudlet.png /usr/share/pixmaps | ||
sudo cp ../mudlet.desktop /usr/share/applications | sudo cp ../mudlet.desktop /usr/share/applications | ||
| − | + | ||
| − | + | 5. '''optional additional software''' | |
| + | |||
One of the major reasons for compiling Mudlet from source is the ability to unlock more features that are not enabled in official AppImage. | One of the major reasons for compiling Mudlet from source is the ability to unlock more features that are not enabled in official AppImage. | ||
Manual compilation will resolve the issues with sound by using system provided libraries, as well as enable more detailed theming of Mudlet application itself. | Manual compilation will resolve the issues with sound by using system provided libraries, as well as enable more detailed theming of Mudlet application itself. | ||
| Line 80: | Line 67: | ||
Many of Qt widget styles and color schemes are available in official repositories, and will make Mudlet better. | Many of Qt widget styles and color schemes are available in official repositories, and will make Mudlet better. | ||
| − | + | 6. '''Mudlet on Wayland''' | |
| − | Mudlet compiled like this will run and work on Wayland, however, there are a few quirks with Keybidings (Numpad may not work as expected). | + | |
| + | Mudlet compiled like this will run and work on Wayland, however, there are a few quirks with Keybidings (Numpad may not work as expected). | ||
Until that is resolved you may wish to start mudlet with: | Until that is resolved you may wish to start mudlet with: | ||
QT_QPA_PLATFORM=xcb mudlet | QT_QPA_PLATFORM=xcb mudlet | ||
(enter in terminal or simply change the Exec= line in /usr/share/applications/mudlet.desktop) | (enter in terminal or simply change the Exec= line in /usr/share/applications/mudlet.desktop) | ||
| − | + | 7. '''uninstallation''' | |
| + | |||
You can reverse the process described in this guide with following command: | You can reverse the process described in this guide with following command: | ||
sudo rm -fr /usr/bin/mudlet /usr/share/mudlet /usr/share/applications/mudlet.desktop /usr/share/pixmaps/mudlet.png | sudo rm -fr /usr/bin/mudlet /usr/share/mudlet /usr/share/applications/mudlet.desktop /usr/share/pixmaps/mudlet.png | ||
| − | ===Ubuntu | + | ===Other Ubuntu Versions=== |
| − | |||
| − | |||
| − | |||
| − | |||
| − | |||
| − | |||
| − | |||
| − | |||
| − | |||
| − | |||
| − | |||
| − | |||
| − | |||
| − | |||
| − | |||
| − | |||
| − | |||
| − | |||
| − | |||
| − | |||
| − | |||
| − | |||
| − | |||
| − | |||
| − | |||
| − | |||
| − | |||
| − | |||
| − | |||
| − | |||
| − | |||
| − | |||
| − | |||
| − | |||
| − | |||
| − | |||
| − | |||
| − | |||
| − | |||
| − | |||
| − | |||
| − | |||
| − | |||
| − | |||
| − | |||
| − | |||
| − | + | Most of the installation instructions for 22.04 should work for older versions as well. Of note is the required version of Qt, which is 5.14. If your used version of Ubuntu only supplies older | |
| − | + | Qt versions, have a look at [https://launchpad.net/~beineri Stephan Binners PPAs], which supplies a whole range of packages for different Ubuntu versions. Be sure to read the installation and | |
| − | + | usage instructions as Qt is installed to /opt and requires sourcing a script to set up. | |
| − | |||
| − | |||
| − | |||
== Compiling on Chrome OS == | == Compiling on Chrome OS == | ||
| Line 152: | Line 92: | ||
'''1. Install dependencies''' | '''1. Install dependencies''' | ||
| − | sudo apt install git build-essential | + | sudo apt install git build-essential \ |
lua5.1 liblua5.1-0-dev libpcre3-dev libboost-dev zlib1g-dev cmake \ | lua5.1 liblua5.1-0-dev libpcre3-dev libboost-dev zlib1g-dev cmake \ | ||
| − | libhunspell-dev lua-rex- | + | libhunspell-dev lua-rex-pcre2 lua-sql-sqlite3 lua-filesystem lua-zip libyajl-dev \ |
libzip-dev libglu1-mesa-dev ccache libpugixml-dev mesa-common-dev qtcreator \ | libzip-dev libglu1-mesa-dev ccache libpugixml-dev mesa-common-dev qtcreator \ | ||
libpulse-dev libglib2.0-dev luarocks libboost-all-dev libsecret-1-dev \ | libpulse-dev libglib2.0-dev luarocks libboost-all-dev libsecret-1-dev \ | ||
| − | ninja-build libsecret-1-dev | + | ninja-build libsecret-1-dev qt6-tools-dev qt6-5compat-dev qt6-multimedia-dev |
sudo luarocks install luautf8 | sudo luarocks install luautf8 | ||
sudo luarocks install lua-yajl | sudo luarocks install lua-yajl | ||
| Line 176: | Line 116: | ||
'''then:''' | '''then:''' | ||
| − | ninja | + | ninja -j 2 |
'''5. Start the application you have just compiled - enjoy''' | '''5. Start the application you have just compiled - enjoy''' | ||
src/mudlet | src/mudlet | ||
| − | |||
== Compiling on macOS == | == Compiling on macOS == | ||
| Line 211: | Line 150: | ||
eval `luarocks path --lua-version=5.1` | eval `luarocks path --lua-version=5.1` | ||
For the following, one may have to add <code>''_DIR="/opt/homebrew/"''</code> such as <code>PCRE_DIR="/opt/homebrew/"</code> or <code>ZIP_DIR="/opt/homebrew/"</code> if the installation could not find header files. | For the following, one may have to add <code>''_DIR="/opt/homebrew/"''</code> such as <code>PCRE_DIR="/opt/homebrew/"</code> or <code>ZIP_DIR="/opt/homebrew/"</code> if the installation could not find header files. | ||
| − | luarocks --lua-version=5.1 --lua-dir=`brew --prefix [email protected]` install lrexlib-pcre | + | luarocks --lua-version=5.1 --lua-dir=`brew --prefix [email protected]` install lrexlib-pcre PCRE_DIR=`brew --prefix pcre` |
brew install sqlite | brew install sqlite | ||
luarocks --lua-version=5.1 --lua-dir=`brew --prefix [email protected]` install luasql-sqlite3 SQLITE_DIR=`brew --prefix sqlite` | luarocks --lua-version=5.1 --lua-dir=`brew --prefix [email protected]` install luasql-sqlite3 SQLITE_DIR=`brew --prefix sqlite` | ||
luarocks --lua-version=5.1 --lua-dir=`brew --prefix [email protected]` install luautf8 | luarocks --lua-version=5.1 --lua-dir=`brew --prefix [email protected]` install luautf8 | ||
| − | |||
luarocks --lua-version=5.1 --lua-dir=`brew --prefix [email protected]` install luafilesystem | luarocks --lua-version=5.1 --lua-dir=`brew --prefix [email protected]` install luafilesystem | ||
| − | luarocks --lua-version=5.1 --lua-dir=`brew --prefix [email protected]` install lua-zip | + | luarocks --lua-version=5.1 --lua-dir=`brew --prefix [email protected]` install lua-zip ZIP_DIR=`brew --prefix libzip` |
| − | brew install | + | brew install boost |
| − | |||
| − | |||
| − | |||
| − | |||
| − | |||
| − | |||
| − | |||
| − | |||
OK to answer yes to delete files if prompted for the <code>rm</code> command above. | OK to answer yes to delete files if prompted for the <code>rm</code> command above. | ||
'''4. Run the following commands''' | '''4. Run the following commands''' | ||
| − | cd | + | cd build |
cmake ../../Mudlet -DCMAKE_PREFIX_PATH=`brew --prefix qt5` | cmake ../../Mudlet -DCMAKE_PREFIX_PATH=`brew --prefix qt5` | ||
make -j `sysctl -n hw.ncpu` | make -j `sysctl -n hw.ncpu` | ||
| Line 243: | Line 173: | ||
open src/Mudlet.app | open src/Mudlet.app | ||
| − | == Compiling on Debian | + | '''6. Qt Creator setup''' |
| + | |||
| + | No Lua installation is found, despite it existing on your system? Launch Qt Creator by doing <code>open /Applications/Qt Creator.app</code> (location depends on how you installed it). | ||
| + | |||
| + | Receiving a <code>No rule to make target ... libQt5UiTools_debug.a</code> error? A workaround is to [https://bugreports.qt.io/browse/QTBUG-81251?focusedCommentId=538705&page=com.atlassian.jira.plugin.system.issuetabpanels%3Acomment-tabpanel#comment-538705 symlink a file]. | ||
| + | |||
| + | Mudlet in Qt Creator is not launching due to <code>dyld: Symbol not found: __cg_jpeg_resync_to_restart</code>? See [https://stackoverflow.com/a/44851430/72944 here] for a workaround. | ||
| + | |||
| + | '''7. (Optional) Discord Integration on ARM64''' | ||
| + | |||
| + | ARM64 binaries are not available libdiscord-rpc so you need to compile and combine it with the existing x86_64 binary into a universal binary. | ||
| + | |||
| + | <syntaxhighlight lang="bash"> | ||
| + | git clone --single-branch --branch v3.3.0 https://github.com/discord/discord-rpc.git | ||
| + | cd discord-rpc | ||
| + | python build.py libs --shared | ||
| + | lipo ./builds/install/osx-dynamic/lib/libdiscord-rpc.dylib /path/to/existing/x86_64/libdiscord-rpc.dylib -output libdiscord-rpc.dylib -create | ||
| + | // verify that it's a universal binary: | ||
| + | otool -L libdiscord-rpc.dylib | ||
| + | // check it in to source control | ||
| + | </syntaxhighlight> | ||
| + | |||
| + | '''8. Troubleshooting''' | ||
| + | If you exhaust all efforts to get YAJL to compile on your local system with homebrew, [https://github.com/lloyd/yajl/ clone from the YAJL repository] then <code>./configure && sudo make install</code>. | ||
| + | |||
| + | == Compiling on Debian == | ||
'''1. Install required packages from main repo.''' | '''1. Install required packages from main repo.''' | ||
| − | sudo apt-get install build-essential git liblua5.1-dev zlib1g-dev libhunspell-dev libpcre3-dev \ | + | sudo apt-get install build-essential git liblua5.1-0-dev zlib1g-dev libhunspell-dev libpcre3-dev \ |
| − | libzip-dev libboost-dev libyajl-dev libpulse-dev lua-rex- | + | libzip-dev libboost-dev libyajl-dev libpulse-dev libsecret-1-dev lua-rex-pcre2 lua-filesystem lua-zip \ |
| − | lua-sql-sqlite3 qt5- | + | lua-sql-sqlite3 qt5-qmake qtmultimedia5-dev qttools5-dev luarocks ccache libpugixml-dev |
sudo luarocks install luautf8 | sudo luarocks install luautf8 | ||
sudo luarocks install lua-yajl | sudo luarocks install lua-yajl | ||
| + | sudo luarocks install lrexlib-pcre | ||
'''2. Grab latest Mudlet source.''' | '''2. Grab latest Mudlet source.''' | ||
| Line 268: | Line 224: | ||
sudo make install | sudo make install | ||
| − | + | '''4. (Optional) Discord library''' | |
| − | |||
| − | ' | ||
| − | |||
| − | |||
| − | |||
| − | |||
| − | |||
| − | |||
| − | |||
| − | |||
| − | |||
| − | |||
| − | |||
| − | |||
| − | |||
| − | |||
| − | |||
| − | |||
| − | |||
| − | |||
| − | |||
| − | |||
| − | |||
| − | + | If you get the following error; | |
| − | + | Could not find Discord library - searched in: | |
| − | + | you need to specify the discord library in your build. Run the following, changing the path where necessary; | |
| − | + | export LD_LIBRARY_PATH=$LD_LIBRARY_PATH:/home/user/mudlet-dev/Mudlet/3rdparty/discord/rpc/lib/ | |
| − | + | and recompile. You should see | |
| − | + | Discord integration loaded. Using functions from: "libdiscord-rpc.so" | |
== Compiling on Raspberry Pi OS == | == Compiling on Raspberry Pi OS == | ||
| Line 313: | Line 246: | ||
sudo apt-get update | sudo apt-get update | ||
sudo apt-get install build-essential git liblua5.1-dev zlib1g-dev libhunspell-dev libpcre3-dev \ | sudo apt-get install build-essential git liblua5.1-dev zlib1g-dev libhunspell-dev libpcre3-dev \ | ||
| − | libzip-dev libboost-graph-dev libyajl-dev libpulse-dev lua-rex- | + | libzip-dev libboost-graph-dev libyajl-dev libpulse-dev lua-rex-pcre2 lua-filesystem lua-zip \ |
| − | lua-sql-sqlite3 qt5- | + | lua-sql-sqlite3 qt5-assistant qtmultimedia5-dev qttools5-dev luarocks ccache libpugixml-dev cmake |
| Line 321: | Line 254: | ||
''' 1.b Install luarocks dependencies ''' | ''' 1.b Install luarocks dependencies ''' | ||
| − | sudo luarocks install luautf8 | + | sudo luarocks install luautf8 |
| − | sudo luarocks install lua-yajl YAJL_LIBDIR=/usr | + | sudo luarocks install lrexlib-pcre |
| + | sudo luarocks install lua-yajl YAJL_LIBDIR=`find /usr -name "libyajl.so" -printf '%h\n'` YAJL_INCDIR=/usr/include | ||
| Line 330: | Line 264: | ||
mkdir ~/source && cd ~/source | mkdir ~/source && cd ~/source | ||
| − | git clone https://github.com/Mudlet/Mudlet.git | + | git clone --recursive -b development https://github.com/Mudlet/Mudlet.git |
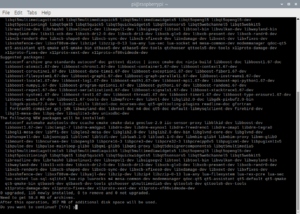
[[File:After-get-mudlet-source.png|center|thumb|After cloning]] | [[File:After-get-mudlet-source.png|center|thumb|After cloning]] | ||
| Line 353: | Line 287: | ||
''' THEN: ''' | ''' THEN: ''' | ||
| − | :For the fastest compile time | + | :For the fastest compile time while still being able to use the system at all (~35min on a RPi4 with 4GB of ram) |
| − | make -j `nproc` | + | make -j $(expr `nproc` - 1) |
''' OR: ''' | ''' OR: ''' | ||
| − | : | + | :Use this if you have an older Raspberry Pi. Be prepared for it to take a while (over an hour) - ''it is not recommended to try to more than one compilation task at a time on the older systems with the '''-j''' option as they will only have a system memory with enough space for one of some of those tasks'': |
make | make | ||
| Line 374: | Line 308: | ||
mudlet | mudlet | ||
| − | == Compiling on | + | == Compiling on Arch Linux == |
| − | Mudlet is available in the [https://aur.archlinux.org Arch User Repository]. | + | ===AUR Install and Compile=== |
| + | Mudlet is available in the [https://aur.archlinux.org Arch User Repository]. | ||
| + | (If the AUR has become unmaintained/orphaned, then skip below to [https://wiki.mudlet.org/w/Compiling_Mudlet#Manual_Install_and_Compile Manual install].) | ||
To install it use your favourite AUR helper (helper tool will automatically resove dependancies); example using ''yay'' : | To install it use your favourite AUR helper (helper tool will automatically resove dependancies); example using ''yay'' : | ||
| Line 387: | Line 323: | ||
''Built in fonts have been disabled, but are available in packages listed as optional dependancies.'' | ''Built in fonts have been disabled, but are available in packages listed as optional dependancies.'' | ||
| − | ''Discord support in Mudlet depends on an | + | ''Discord support in Mudlet depends on an external library provided by discord-rpc-api, which is also available in AUR, choose whichever variant suits you best.'' |
| + | |||
| + | ===Manual Install and Compile=== | ||
| + | These instructions will get you setup compiling on Arch. Need a hand? Join us on Mudlet's [https://discord.gg/BwgJpMj Discord] or [http://forums.mudlet.org/viewforum.php?f=7 forums]. | ||
| + | |||
| + | '''1. necessary dependencies''' | ||
| + | |||
| + | Majority of required dependencies can be obtained from repositories, and can be installed with following command: | ||
| + | |||
| + | sudo pacman -S --needed cmake qt5-multimedia hunspell libzip lua51-filesystem qt5-gamepad lua51-luautf8 pugixml \ | ||
| + | ttf-font qtkeychain-qt5 boost qt5-tools ttf-bitstream-vera ttf-ubuntu-font-family noto-fonts-emoji glu luarocks | ||
| + | |||
| + | Few of required Lua modules are not available in official repositories, so they have to be installed using ''luarocks'' | ||
| + | sudo lua5.1 /usr/bin/luarocks install lcf | ||
| + | sudo lua5.1 /usr/bin/luarocks install luautf8 | ||
| + | sudo lua5.1 /usr/bin/luarocks install lua-yajl | ||
| + | sudo lua5.1 /usr/bin/luarocks install lrexlib-pcre | ||
| + | sudo lua5.1 /usr/bin/luarocks install luasql-sqlite3 | ||
| + | sudo lua5.1 /usr/bin/luarocks install lua-zip | ||
| + | |||
| + | There is an optional dependency for discord integration: | ||
| + | git clone https://github.com/discord/discord-rpc | ||
| + | cd discord-rpc | ||
| + | mkdir build | ||
| + | cd build | ||
| + | cmake .. -DCMAKE_INSTALL_PREFIX=/usr | ||
| + | sudo cmake --build . --config Release --target install | ||
| + | |||
| + | '''2. obtaining the source code''' | ||
| + | |||
| + | Obtain the latest in-development code with: | ||
| + | git clone --recursive -b development https://github.com/Mudlet/Mudlet.git | ||
| + | mkdir Mudlet/build | ||
| + | cd Mudlet/build | ||
| + | |||
| + | '''3. compiling the code''' | ||
| + | |||
| + | There below are two ways to build with qmake, the first is for general use, the second is for developers: | ||
| + | qmake ../src/mudlet.pro | ||
| + | '''*OR*''' | ||
| + | qmake CONFIG+=debug ../src/mudlet.pro | ||
| + | |||
| + | '''Now finish compiling:''' | ||
| + | make -j `nproc` | ||
| + | |||
| + | '''4. installing compiled code''' | ||
| + | |||
| + | After successful code compilation, next few commands will install resulting binaries, desktop file for menus and appropriate icon. | ||
| + | sudo make install | ||
| + | sudo cp ../mudlet.png /usr/share/pixmaps | ||
| + | sudo cp ../mudlet.desktop /usr/share/applications | ||
| + | |||
| + | '''5. optional additional software''' | ||
| + | |||
| + | One of the major reasons for compiling Mudlet from source is the ability to unlock more features that are not enabled in official AppImage. | ||
| + | Manual compilation will resolve the issues with sound by using system provided libraries, as well as enable more detailed theming of Mudlet application itself. | ||
| + | However, do take note that Mudlet is a Qt based program, and that theming will not 'just work' in GTK based desktop environments (Gnome, XFCE, MATE, Budgie). | ||
| + | sudo pacman -S install qt5ct | ||
| + | will install a tool for configuration of look and feel of Qt programs inside those desktop environments.↵Users of Qt based Desktop environments (KDE Plasma, LXQT) can simply use settings provided by environment itself. | ||
| + | |||
| + | Many of Qt widget styles and color schemes are available in official repositories, and will make Mudlet better. | ||
| + | |||
| + | 6. '''Mudlet on Wayland''' | ||
| − | + | Mudlet compiled like this will run and work on Wayland, however, there are a few quirks with Keybindings (Numpad may not work as expected). | |
| − | + | Until that is resolved you may wish to start mudlet with: | |
| + | QT_QPA_PLATFORM=xcb mudlet | ||
| + | (enter in terminal or simply change the Exec= line in /usr/share/applications/mudlet.desktop) | ||
| + | |||
| + | 7. '''uninstallation''' | ||
| + | |||
| + | You can reverse the process described in this guide with following command: | ||
| + | |||
| + | sudo rm -fr /usr/bin/mudlet /usr/share/mudlet /usr/share/applications/mudlet.desktop /usr/share/pixmaps/mudlet.png | ||
| + | |||
| + | == Compiling on Fedora (aarch64) == | ||
| − | + | '''1. Install dependencies''' | |
| + | sudo dnf groupinstall "Development Tools" "Development Libraries" | ||
| − | + | sudo dnf install compat-lua compat-lua-devel compat-lua-libs hunspell-devel lua5.1-filesystem luarocks pugixml-devel qtkeychain-qt5-devel bitstream-vera-fonts-all ccache qt-creator qt5-qtmultimedia-devel qt5-qtgamepad-devel yajl-devel qtchooser qt5-qttools-devel qt5-qttools-static zziplib-devel pcre-devel libzip-devel sqlite-devel | |
| − | + | sudo luarocks --lua-version 5.1 --tree=/usr install luazip | |
| + | sudo luarocks --lua-version 5.1 --tree=/usr install luasql-sqlite3 | ||
| + | sudo luarocks --lua-version 5.1 --tree=/usr install lcf | ||
| + | sudo luarocks --lua-version 5.1 --tree=/usr install luautf8 | ||
| + | sudo luarocks --lua-version 5.1 --tree=/usr install lua-yajl | ||
| + | sudo luarocks --lua-version 5.1 --tree=/usr install lrexlib-pcre | ||
| + | In your user's home directory: | ||
| − | + | If you use a bash shell: | |
| + | luarocks --lua-version 5.1 path --no-bin >> .bashenv | ||
| + | source .bashenv | ||
| + | If you use a zsh shell: | ||
| + | luarocks --lua-version 5.1 path --no-bin >> .zshenv | ||
| + | source .zshenv | ||
| + | If you use a csh shell: | ||
| + | luarocks --lua-version 5.1 path --no-bin >> .cshenv | ||
| + | source .cshenv | ||
| + | This should cover paths, but you may want to reboot to be sure. | ||
| − | + | '''2. Obtain the source code''' | |
| − | + | git clone --recursive --branch=development <nowiki>https://github.com/Mudlet/Mudlet.git</nowiki> | |
| − | + | mkdir Mudlet/build | |
| + | cd Mudlet/src | ||
| − | ''' | + | '''3. Make necessary compiling instruction adjustments''' |
| − | + | Edit mudlet.pro - find these lines in mudlet.pro and make the following changes: | |
| + | linux { | ||
| + | LIBS += \ | ||
| + | -llua5.1 \ | ||
| + | -lhunspell | ||
| + | INCLUDEPATH += /usr/include/lua5.1 | ||
| + | } | ||
| + | We're adding a - between lua and 5.1 and adding -1.7 to hunspell under LIBS so that it becomes this: | ||
| + | linux { | ||
| + | LIBS += \ | ||
| + | -llua-5.1 \ | ||
| + | -lhunspell-1.7 | ||
| + | INCLUDEPATH += /usr/include/lua5.1 | ||
| + | } | ||
| + | Save and exit. | ||
| − | + | '''4. Compile''' | |
| + | cd ../build | ||
| + | Run this in the build directory: | ||
| + | WITH_FONTS=NO WITH_OWN_QTKEYCHAIN=NO WITH_UPDATER=NO WITH_VARIABLE_SPLASH_SCREEN=NO XDG_DATA_DIRS=/usr/share qmake-qt5 PREFIX=/usr INCLUDEPATH+=/usr/include/lua-5.1 LUA_SEARCH_OUT=lua-5.1 ../src/mudlet.pro | ||
| + | An explanation of the qmake arguments -- we're passing these environment variables to mudlet.pro: | ||
| + | WITH_FONTS=NO WITH_OWN_KEYCHAIN=NO WITH_UPDATER=NO WITH_VARIABLE_SPLASH_SCREEN=NO XDG_DATA_DIRS=/usr/share | ||
| + | Adding build variables to mudlet.pro so that it finds the correct libraries: | ||
| + | PREFIX=/usr INCLUDEPATH+=/usr/include/lua-5.1 | ||
| + | And finally adding a build variable to translations/translated/updateqm.pri so that it uses the correct version of the Lua compiler (Fedora also comes with 5.4) to generate translation statistics. | ||
| + | LUA_SEARCH_OUT=lua-5.1 | ||
| + | Once complete, run the following: | ||
| − | + | If you have time to kill (About 10 minutes on an Apple M1 Max in Fedora): | |
| + | make | ||
| + | If you want it done as fast as possible(Less than a minute on an Apple M1 Max in Fedora): | ||
| + | make -j `nproc` | ||
| + | Or if you want something in between, make -j `nproc` tells it to use all available processor cores. If you want to use a specific number instead (ie 2), you can use: | ||
| + | make -j 2 | ||
| − | + | '''5. Install''' | |
| + | sudo make install | ||
| + | sudo cp ../mudlet.png /usr/share/pixmaps | ||
| + | sudo cp ../mudlet.desktop /usr/share/applications | ||
| − | + | '''6. Hang onto the cloned git repo ''' | |
| + | If you need to uninstall, you can go back into the /build directory and 'sudo make uninstall'. | ||
| − | + | == Compiling on Gentoo == | |
| + | An [https://github.com/toaster/gentoo-overlay overlay containing Mudlet is available] for compiling Mudlet on Gentoo. | ||
| − | + | == Compiling on Windows == | |
| + | |||
| + | * Install '''MSYS2''': https://www.msys2.org | ||
| + | |||
| + | * At the end of installation uncheck '''run msys2 now''' and click '''finish''' | ||
| − | + | * Run '''MSYS2 MINGW64''' from the start menu | |
| − | + | * Run the following in the opened MSYS2 terminal (you right-click in order to paste): | |
| + | pacman --files --refresh | ||
| + | pacman --sync git mingw-w64-x86_64-qt-creator mingw-w64-x86_64-cmake mingw-w64-x86_64-ninja mingw-w64-x86_64-clang-libs --noconfirm | ||
| − | + | * Run the following from the MSYS2 terminal: | |
| + | git clone --recursive -b development https://github.com/Mudlet/Mudlet.git | ||
| − | + | * Setup the development environment (~5-10min) by running: | |
| + | ./Mudlet/CI/setup-windows-sdk.sh | ||
| − | + | Take note of the message at the end to add the variables to your environment once you have opened the project in Qt Creator. | |
| + | (WITH_MAIN_BUILD_SYSTEM, MINGW_BASE_DIR, LUA_PATH, LUA_CPATH) | ||
| + | [[File:Windows environment variables.png|500px|center]] | ||
| − | + | {{note}} This might not work on windows arm64, pacman freezes. | |
| − | Open | + | * Open Qt Creator. You will need to open it via MSYS2 every time: |
| + | /mingw64/bin/qtcreator.exe | ||
| − | + | * Press '''link with Qt''' on the bottom right of Qt Creator | |
| − | + | [[File:Link with qt.png|500px|center]] | |
| − | + | * Choose <code>C:/msys64/mingw64</code> as the location then restart Qt Creator | |
| − | + | [[File:Qt location.png|500px|center]] | |
| − | + | * '''Open project'''; C:/msys64/home/<user>/Mudlet/src/mudlet.pro | |
| − | + | [[File:Open new project - qtcreator.png|500px|center]] | |
| − | + | * In Build Environment details, set environment variables to what was stated in the sdk-setup script above. | |
| − | + | [[File:Build environmental variables.png|500px|center]] | |
| − | + | * Build Mudlet (Ctrl+B) | |
| + | * Run Mudlet (Ctrl+R) | ||
| − | |||
=== Contributing changes === | === Contributing changes === | ||
Once you're all done with your changes, contribute them to Mudlet using a [https://help.github.com/desktop/guides/contributing-to-projects/creating-a-pull-request/#platform-windows pull request]. Thanks for improving open-source! | Once you're all done with your changes, contribute them to Mudlet using a [https://help.github.com/desktop/guides/contributing-to-projects/creating-a-pull-request/#platform-windows pull request]. Thanks for improving open-source! | ||
| − | |||
| − | |||
| − | |||
| − | |||
| − | |||
| − | |||
| − | |||
| − | |||
| − | |||
| − | |||
== Compiling on Github Codespaces == | == Compiling on Github Codespaces == | ||
| − | Github Codespaces allow you to code and run Mudlet all from the browser - makes it a lot easier to get started. It also allows you to code Mudlet itself from any computer in the world! | + | [https://github.com/features/codespaces/ Github Codespaces] allow you to code and run Mudlet all from the browser - makes it a lot easier to get started. It also allows you to code Mudlet itself from any computer in the world! |
'''1. Create a new codespace''' | '''1. Create a new codespace''' | ||
| Line 530: | Line 590: | ||
Clone the development branch | Clone the development branch | ||
| − | git clone -b development https://github.com/Mudlet/Mudlet.git | + | git clone --recursive -b development https://github.com/Mudlet/Mudlet.git |
cd Mudlet/docker | cd Mudlet/docker | ||
| Line 539: | Line 599: | ||
If you wish to customize things like the number of cores to use for building mudlet, feel free to change the corresponding values in the .env file. | If you wish to customize things like the number of cores to use for building mudlet, feel free to change the corresponding values in the .env file. | ||
| − | To run Qt-Creator and develop Mudlet, | + | To run Qt-Creator and develop Mudlet, run <code>docker-compose up dev</code>. |
| − | To run Mudlet, | + | |
| + | To run Mudlet, run <code>docker-compose up mudlet</code>. Note: At the moment, the mudlet build will not persist settings past container rebuilds. | ||
| + | |||
| + | = Setting up IDEs = | ||
| + | == CLion == | ||
| + | === Qt not detected === | ||
| + | If you'd like to use CLion and it is giving the following error: | ||
| + | |||
| + | <nowiki> | ||
| + | By not providing "FindQt5Core.cmake" in CMAKE_MODULE_PATH this project has | ||
| + | asked CMake to find a package configuration file provided by "Qt5Core", but | ||
| + | CMake did not find one. | ||
| + | |||
| + | ... | ||
| + | </nowiki> | ||
| + | |||
| + | You can fix this by setting <code>-DCMAKE_PREFIX_PATH=<your Qt + version + compiler location></code>. For example: <code>-DCMAKE_PREFIX_PATH=/media/vadi/SSDer/Programs/Qt/5.14.2/gcc_64/</code> [[File:CLion CMake settings - finidng Qt.png|700px|none]] | ||
| + | |||
| + | === CLion setup on Windows === | ||
| + | After running <code>setup-windows-sdk.ps1</code> make sure to set Cmake options to: | ||
| + | -DCMAKE_PREFIX_PATH=C:\Qt\Tools\mingw730_32;C:\Qt\5.14.2\mingw73_32 -DBoost_INCLUDE_DIR=C:\Libraries\boost_1_77_0 | ||
| + | ''Directories might vary slightly, when different Qt, Boost or MinGW version will be used.'' | ||
| + | |||
| + | [[File:Clion Settings - Cmake.png|frameless|700x700px]] | ||
| + | |||
| + | |||
| + | |||
| + | You will need 32 bit version of MinGW. Set it in the <code>Toolset</code> field to: | ||
| + | C:\Qt\Tools\mingw730_32 | ||
| + | |||
| + | ''Directory may be slightly different if MinGW version used will change.'' | ||
| + | |||
| + | [[File:Toolchain.png|frameless|700x700px]] | ||
| + | |||
| + | === Clang Tidy === | ||
| + | Ensure that CLion is set to run the project's [https://www.jetbrains.com/help/clion/clang-tidy-checks-support.html#paticularcheck .clang-tidy checks] with the <code>Prefer .clang-tidy files over IDE settings</code> option: | ||
| + | |||
| + | [[File:Clang Tidy CLIon.png|700px|none]] | ||
| + | |||
| + | This helps us catch any issues just a bit earlier. | ||
| + | |||
| + | ===Checking memory leaks & other issues (sanitizers)=== | ||
| + | Besides clang-tidy, it's also possible to enable clang sanitizers to double-check for issues: | ||
| + | |||
| + | * [https://clang.llvm.org/docs/LeakSanitizer.html LeakSanitizer] for detecting memory leaks | ||
| + | * [https://clang.llvm.org/docs/AddressSanitizer.html AddressSanitizer] for detecting most issues dealing with memory, such as out of bounds accesses to heap, stack, global and more | ||
| + | * [https://clang.llvm.org/docs/UndefinedBehaviorSanitizer.html UndefinedBehaviourSanitizer] for detecting the use of various features of C/C++ that are explicitly listed as resulting in undefined behaviour (such as using misaligned or null pointer, conversion to, from, or between floating-point types which would overflow the destination, division by zero, etc) | ||
| + | * [https://clang.llvm.org/docs/MemorySanitizer.html MemorySanitizer] for detecting reading uninitialised memory | ||
| + | * [https://clang.llvm.org/docs/ThreadSanitizer.html ThreadSanitizer] for detecting threading issues | ||
| + | |||
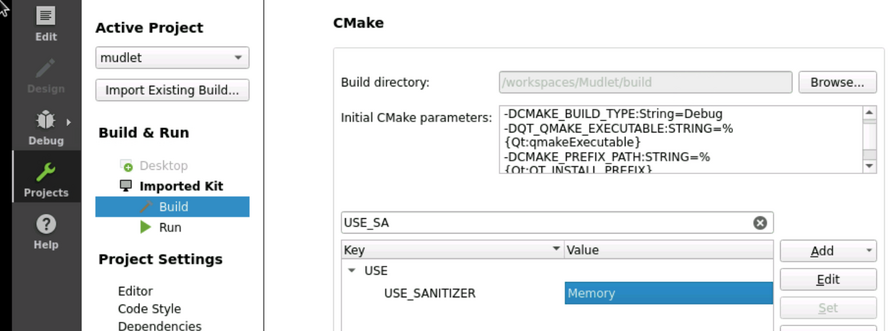
| + | To use the sanitisers, set the <code>USE_SANITIZER</code> CMake variable to one or several variables (separate by comma): <code>Address</code>, <code>Memory</code>, <code>MemoryWithOrigins</code>, <code>Undefined</code>, <code>Thread</code>, or <code>Leak</code> | ||
| + | |||
| + | To use them in CLion, adjust the CMake settings: | ||
| + | |||
| + | [[File:Clion_cmake_settings.png|frameless|890x890px]] | ||
| + | |||
| + | Not all sanitisers can be used with each other - in that case the cmake configuration won't allow you to continue. | ||
| − | == | + | === Clang Format === |
| + | Ensure that [https://www.jetbrains.com/help/clion/clangformat-as-alternative-formatter.html#clion-support CLion is set to use] the <code>.clang-format</code> formatting style: | ||
| − | + | [[File:Clang-format CLion.png]] | |
| − | + | This helps keep the look'n'feel of the source code in a consistent manner, even with many people contributing to Mudlet. | |
| − | + | == Visual Studio Code == | |
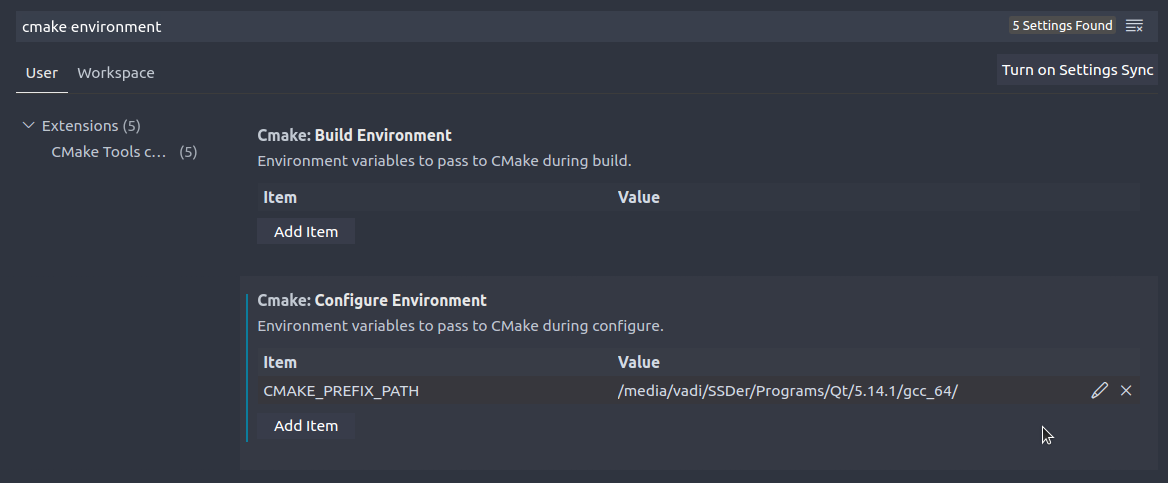
| − | + | To set the path in Visual Studio Code, open settings, search for <code>cmake environment</code> and set the <code>CMAKE_PREFIX_PATH</code> to your path, such as <code>/home/vadi/Programs/Qt/5.15.2/gcc_64</code>: | |
| − | |||
| − | |||
| − | |||
| − | </ | ||
| − | : | + | [[File:CMake path in Visual Studio Code.png|none]] |
| − | |||
| − | |||
| − | |||
| − | |||
| − | + | ===Clang Tidy=== | |
| + | clang-tidy catches common programming issues, run it by selecting 'Analysis' from the command palette (Ctrl+Shift+P by default): | ||
| − | : | + | [[File:Clang-tidy in vscode.png|none]] |
| − | + | It is also possible [https://devblogs.microsoft.com/cppblog/visual-studio-code-c-december-2021-update-clang-tidy/ check status of analysis and cancel if needed]. | |
| − | |||
| − | |||
| − | |||
| − | |||
| − | |||
| − | |||
| − | |||
| − | |||
| − | |||
| − | --2021- | ||
| − | |||
| − | |||
| − | |||
| − | |||
| − | |||
| − | + | ===Checking memory leaks & other issues (sanitizers)=== | |
| + | Besides clang-tidy, it's also possible to enable clang sanitizers to double-check for issues: | ||
| − | + | * [https://clang.llvm.org/docs/LeakSanitizer.html LeakSanitizer] for detecting memory leaks | |
| + | * [https://clang.llvm.org/docs/AddressSanitizer.html AddressSanitizer] for detecting most issues dealing with memory, such as out of bounds accesses to heap, stack, global and more | ||
| + | * [https://clang.llvm.org/docs/UndefinedBehaviorSanitizer.html UndefinedBehaviourSanitizer] for detecting the use of various features of C/C++ that are explicitly listed as resulting in undefined behaviour (such as using misaligned or null pointer, conversion to, from, or between floating-point types which would overflow the destination, division by zero, etc) | ||
| + | * [https://clang.llvm.org/docs/MemorySanitizer.html MemorySanitizer] for detecting reading uninitialised memory | ||
| + | * [https://clang.llvm.org/docs/ThreadSanitizer.html ThreadSanitizer] for detecting threading issues | ||
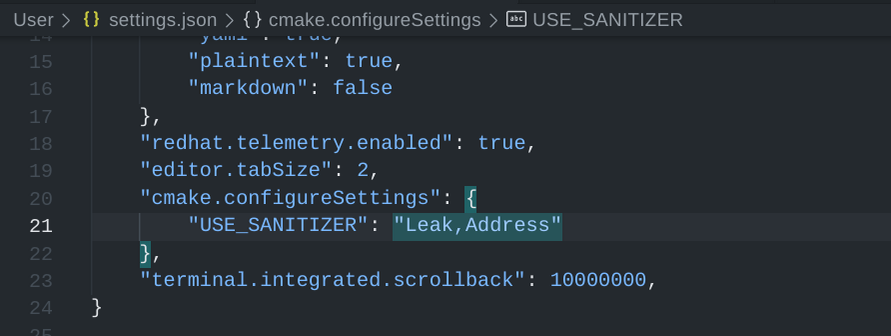
| + | To use the sanitisers, set the <code>USE_SANITIZER</code> CMake variable to one or several variables (separate by comma): <code>Address</code>, <code>Memory</code>, <code>MemoryWithOrigins</code>, <code>Undefined</code>, <code>Thread</code>, or <code>Leak</code> | ||
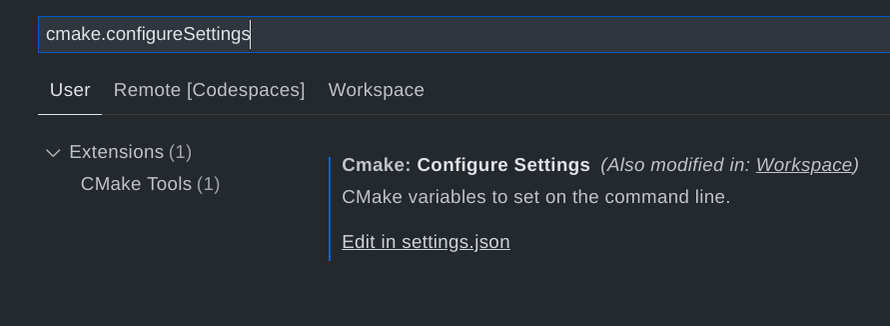
| − | + | To use them in VSCode, set the <code>cmake.configureSettings</code> variable: | |
| − | |||
| − | |||
| − | |||
| − | |||
| − | + | [[File:Cmake.configureSettings option in vscode.png|frameless|890x890px]] | |
| − | + | [[File:Choosing which sanitizers in vscode to use.png|frameless|891x891px]] | |
| − | + | Not all sanitisers can be used with each other - in that case the cmake configuration won't allow you to continue. | |
| − | |||
| − | |||
| − | |||
| − | |||
| − | |||
| − | |||
| − | |||
| − | + | == Qt Creator== | |
| − | + | ===Clang Tidy and Clazy=== | |
| − | |||
| − | |||
| − | |||
| − | |||
| − | |||
| − | |||
| − | |||
| − | |||
| − | |||
| − | |||
| − | |||
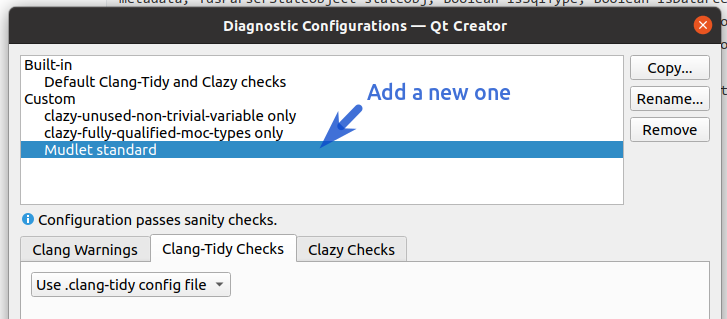
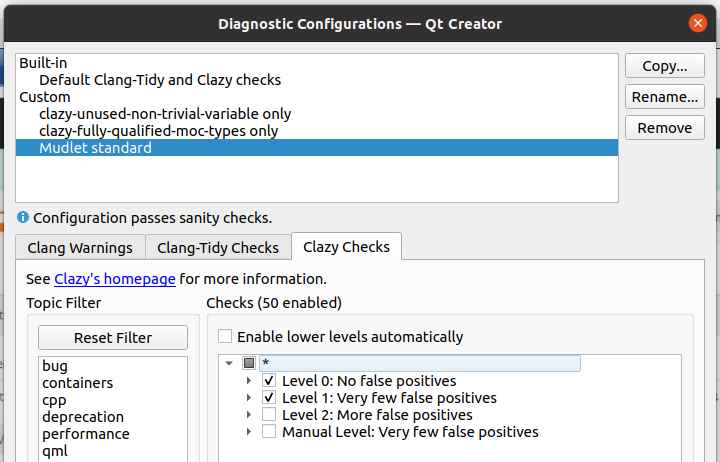
| − | + | Configure Mudlet-specific checks for [https://clang.llvm.org/extra/clang-tidy/ clang-tidy] and [https://github.com/KDE/clazy clazy] tools help catch any issues early on. See [https://doc.qt.io/qtcreator/creator-clang-tools.html Qt Creator's instructions] for setting this up - clang-tidy can use the <code>.clang-tidy</code> file that's available at the root of the repository, and for clazy enable <code>level0</code> and <code>level1</code> checks. | |
| − | + | [[File:Clang tidy configuration.png|frame|none]] | |
| + | [[File:Clazy configuration.png|frame|none]] | ||
| + | ===Checking memory leaks & other issues (sanitizers)=== | ||
| + | Besides clang-tidy, it's also possible to enable clang sanitizers to double-check for issues: | ||
| − | + | * [https://clang.llvm.org/docs/LeakSanitizer.html LeakSanitizer] for detecting memory leaks | |
| − | + | * [https://clang.llvm.org/docs/AddressSanitizer.html AddressSanitizer] for detecting most issues dealing with memory, such as out of bounds accesses to heap, stack, global and more | |
| − | + | * [https://clang.llvm.org/docs/UndefinedBehaviorSanitizer.html UndefinedBehaviourSanitizer] for detecting the use of various features of C/C++ that are explicitly listed as resulting in undefined behaviour (such as using misaligned or null pointer, conversion to, from, or between floating-point types which would overflow the destination, division by zero, etc) | |
| − | + | * [https://clang.llvm.org/docs/MemorySanitizer.html MemorySanitizer] for detecting reading uninitialised memory | |
| − | + | * [https://clang.llvm.org/docs/ThreadSanitizer.html ThreadSanitizer] for detecting threading issues | |
| − | + | To use the sanitisers, set the <code>USE_SANITIZER</code> CMake variable to one or several variables (separate by comma): <code>Address</code>, <code>Memory</code>, <code>MemoryWithOrigins</code>, <code>Undefined</code>, <code>Thread</code>, or <code>Leak</code> | |
| − | + | To use them in Qt creator, head to <code>Projects</code> - <code>Build</code>: | |
| − | + | [[File:Sanitisers in qt creator.png|frameless|890x890px]] | |
| − | |||
| − | |||
| − | |||
| − | |||
| − | |||
| − | : | ||
| − | |||
| − | + | Not all sanitisers can be used with each other - in that case the cmake configuration won't allow you to continue. | |
| − | </ | + | |
| − | + | ==Clang Format== | |
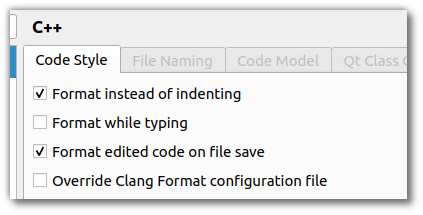
| + | Ensure that Qt Creator is set to use the <code>.clang-format</code> formatting style in the C++ settings. Turn on <code>Format instead of indenting</code> for <code>Ctrl+I</code> to format code, and ensure <code>Override Clang Format configuration file</code> is disabled: | ||
| − | : | + | [[File:Qt Creator clang format.png]] |
| − | |||
| − | |||
| − | |||
| − | |||
| − | |||
| − | |||
| − | This | + | This helps keep the look'n'feel of the source code in a consistent manner, even with many people contributing to Mudlet. |
| − | |||
| − | |||
| − | |||
| − | |||
| − | |||
| − | |||
| − | |||
| − | |||
| − | |||
| − | |||
| − | |||
| − | |||
| − | |||
| − | |||
| − | |||
| − | |||
| − | + | =Building with multiple versions of Lua= | |
| + | Mudlet uses Lua 5.1 only, so if you are compiling on a system that also has later versions installed, you might get the following error: <code>‘LUA_GLOBALSINDEX’ was not declared in this scope</code>. | ||
| − | + | To fix this, pass the path to Lua headers explicitly. For CMake: <code>-DLUA_INCLUDE_DIR=/usr/include/lua5.1</code> (adjust as needed). | |
| − | |||
| − | |||
| − | |||
| − | |||
| − | |||
| − | |||
| − | |||
| − | |||
| − | |||
| − | |||
| − | |||
| − | |||
| − | |||
| − | |||
| − | |||
| − | |||
| − | :< | ||
| − | |||
| − | |||
| − | </ | ||
| − | |||
| − | + | = Key contributing information = | |
| − | |||
| − | |||
| − | |||
| − | + | Clang format is used to automatically format code submissions using the [https://github.com/Mudlet/Mudlet/blob/development/src/.clang-format src/.clang-format] style. [http://doc.qt.io/qtcreator/creator-beautifier.html See here] how to enable clang-format with Qt Creator - and make sure to specify the 'File' option for the configuration style. | |
| − | |||
| − | |||
| − | + | Branches: | |
| − | |||
| − | |||
| − | |||
| − | + | '''development''' is the development branch where new features can go. | |
| − | |||
| − | |||
| − | + | Workflow: | |
| − | |||
| − | |||
| − | |||
| − | + | Fork and submit a PR with your changes ([https://guides.github.com/activities/forking/ Github tutorial]). | |
| − | |||
| − | + | Here is a list of package versions delivered with different Linux distros. You may want to upgrade these: | |
| − | + | https://repology.org/project/mudlet/versions | |
| − | + | = Lua & Luarocks = | |
| − | |||
| − | |||
| − | + | Mudlet includes a [https://en.wikipedia.org/wiki/Lua_(programming_language) Lua] (version 5.1) scripting system for the end-user, which you, as a reader of this Wiki, may already be aware of! If not, you might wish to (after you have got your hands on a working Mudlet) take a look at [https://wiki.mudlet.org/w/Manual:Lua_Functions Mudlet Lua API] as that is the recommended place to find out the details of all the functions that Mudlet provides on top of the core Lua functionality. | |
| − | |||
| − | |||
| − | |||
| − | |||
| − | + | Some of that ability comes from extra code that is not built-in to Lua but is in the form of external modules either in the form of script (text) files written in the Lua language itself or binary (library) files compiled from (usually but not exclusively [https://en.wikipedia.org/wiki/C_(programming_language) 'C']) source code. In order to have that functionality Mudlet makes use of several of these modules which can most readily (if not already available as "packages" for a particular Operating System) be obtained as '''rocks''' from the public [https://en.wikipedia.org/wiki/LuaRocks Luarocks] collection. Such a rock actually consists of a ''rockspec'' file that gives instructions to the Luarocks tool how to obtains the (source) code, compile it on any supported OS into the form that a Lua interpreter (including the one included in '''''each''''' running Mudlet ''profile'') can use, and where and what it will be placed and called when it has been made. After that it should be available to Lua via the ''require'' command. | |
| − | + | Anyone compiling Mudlet for themselves will find it desirable to ensure they have a usable Luarocks installation and have the ''lua-yajl'' module installed before commencing to compile Mudlet itself; this is because a Lua (version 5.1) interpreter and that module are used within the build process of making the executable code that is the Mudlet application. | |
| − | + | == Included Modules == | |
| − | |||
| − | |||
| − | |||
| − | |||
| − | + | # [https://luarocks.org/modules/xavier-wang/luautf8 luautf8] (manual in README) | |
| − | : | + | # [https://luarocks.org/modules/martin-eden/lcf lcf] (customised version) |
| − | + | # [https://luarocks.org/modules/hisham/luafilesystem luafilesystem] ([http://lunarmodules.github.io/luafilesystem/manual.html manual]) | |
| − | + | # [https://luarocks.org/modules/rrt/lrexlib-pcre lrexlib-pcre] ([https://rrthomas.github.io/lrexlib/manual.html manual]) | |
| − | + | # [http://lunarmodules.github.io/luasql/ luasql-sqlite3] (http://lunarmodules.github.io/luasql/manual.html manual) | |
| + | # [https://luarocks.org/modules/brimworks/lua-yajl lua-yajl] (manual in README) | ||
| + | # [https://luarocks.org/modules/mpeterv/luazip luazip] ([http://mpeterv.github.io/luazip/ manual]) | ||
| − | + | == Adding Luarocks == | |
| − | |||
| − | |||
| − | |||
| − | + | Here's a rundown on checking you can use luarocks. Here we will use the bit32 module as an example. | |
| − | |||
| − | |||
| − | |||
| − | |||
| − | |||
| − | + | 1. Install via luarocks | |
| − | |||
| − | |||
| − | |||
| − | + | > luarocks install bit32 | |
| − | |||
| − | |||
| − | |||
| − | + | 2. Check where luarocks installs the modules. Note the modules section. | |
| − | |||
| − | + | <nowiki> | |
| + | > luarocks show bit32 | ||
| − | + | bit32 5.3.5.1-1 - Lua 5.2 bit manipulation library | |
| − | |||
| − | + | bit32 is the native Lua 5.2 bit manipulation library, in the version from Lua 5.3; it is compatible with Lua 5.1, 5.2, 5.3 and 5.4. | |
| − | + | License: MIT | |
| + | Homepage: http://www.lua.org/manual/5.2/manual.html#6.7 | ||
| + | Installed in: /usr/local | ||
| − | + | Modules: | |
| − | + | bit32 (/usr/local/lib/lua/5.1/bit32.so) | |
| − | + | Depends on: | |
| + | lua >= 5.1, < 5.5 (using 5.1-1) | ||
| + | </nowiki> | ||
| − | + | 3. Recompile mudlet. You may need to adjust lua path and cpath information for your environment. You can use the following commands to help find this information. | |
| − | == | + | <nowiki> |
| + | > luarocks --lua-version 5.1 path --no-bin | ||
| + | export LUA_PATH='./?.lua;/usr/local/share/lua/5.1/?.lua;/usr/local/share/lua/5.1/?/init.lua;/usr/local/lib/lua/5.1/?.lua;/usr/local/lib/lua/5.1/?/init.lua;/usr/share/lua/5.1/?.lua;/usr/share/lua/5.1/?/init.lua;/home/username/.luarocks/share/lua/5.1/?.lua;/home/username/.luarocks/share/lua/5.1/?/init.lua' | ||
| + | export LUA_CPATH='./?.so;/usr/local/lib/lua/5.1/?.so;/usr/lib/x86_64-linux-gnu/lua/5.1/?.so;/usr/lib/lua/5.1/?.so;/usr/local/lib/lua/5.1/loadall.so;/home/username/.luarocks/lib/lua/5.1/?.so | ||
| + | </nowiki> | ||
| − | + | Or from within mudlet itself you can issue these commands to double check the correct paths are being used. | |
| − | + | <nowiki> | |
| + | > lua print(package.path) | ||
| + | /home/username/.config/mudlet/profiles/localhost/?.lua;/home/zooka/.config/mudlet/profiles/localhost/?/init.lua;./?.lua;/usr/local/share/lua/5.1/?.lua;/usr/local/share/lua/5.1/?/init.lua;/usr/local/lib/lua/5.1/?.lua;/usr/local/lib/lua/5.1/?/init.lua;/usr/share/lua/5.1/?.lua;/usr/share/lua/5.1/?/init.lua;/home/username/.luarocks/share/lua/5.1/?.lua;/home/username/.luarocks/share/lua/5.1/?/init.lua | ||
| + | |||
| + | > lua print(package.cpath) | ||
| + | /home/username/.config/mudlet/profiles/localhost/?.so;/home/username/Workspace/mudlet-dev/Mudlet/build/lib/?.so;./?.so;/usr/local/lib/lua/5.1/?.so;/usr/lib/x86_64-linux-gnu/lua/5.1/?.so;/usr/lib/lua/5.1/?.so;/usr/local/lib/lua/5.1/loadall.so;/home/username/.luarocks/lib/lua/5.1/?.so | ||
| + | </nowiki> | ||
| − | + | 4. Recompile and run a test script using the [https://www.lua.org/pil/8.1.html require command] to load in the necessary library. | |
| − | |||
| − | + | <nowiki> | |
| + | bit32 = require("bit32") | ||
| − | + | function bit32_test() | |
| − | + | bit32.band(0,1) | |
| + | end | ||
| + | </nowiki> | ||
| − | == | + | = Enabling Debug Build = |
| − | |||
| − | + | To enable a debug build that can be run through GDB: | |
| − | + | * follow all steps until qmake | |
| + | * modify the qmake line by adding in debug info, e.g.: | ||
| + | qmake CONFIG+=debug ../src/mudlet.pro | ||
| + | * compile as normal | ||
| + | * attach gdb to mudlet | ||
| + | gdb ./mudlet | ||
| + | * within gdb command line start mudlet running by: | ||
| + | run | ||
| + | * proceed to crash mudlet then type | ||
| + | bt | ||
| + | * submit the output with your bug reports. | ||
| − | = | + | = Compile Time Flags = |
| − | |||
| − | + | <nowiki> | |
| + | DEBUG_UTF8_PROCESSING - for decoding the UTF-8 (1 byte with the MSB set or 2, 3 or 4 bytes) encoding | ||
| + | DEBUG_GB_PROCESSING - for decoding the GBK (2 bytes) or GB18030 (2 or 4 bytes) encodiing | ||
| + | DEBUG_BIG5_PROCESSING - for decoding the Big5-ETEN or Big5-HKSCS encodings | ||
| + | DEBUG_EUC_KR_PROCESSING - for decoding the EUC_KR encoding | ||
| + | DEBUG_SGR_PROCESSING - decoding the <ESC>[ codes (that pair of bytes being the CSI "Control Sequence Introducer" - including the one ending in m which is the "Set Graphics Rendition" that Mudlet (and other MUD clients and other things) use to control colours and other font effects. | ||
| + | DEBUG_OSC_PROCESSING - decode the <ESC>] codes (that MUST end with a <ESC>\) - currently Mudlet only handles a couple of these OSC "Operating System Commands". | ||
| + | DEBUG_MXP_PROCESSING - stuff to do with the MXP protocol - which uses a <ESC> ... z sequence of characters to do some things... | ||
| + | </nowiki> | ||
Latest revision as of 08:52, 21 October 2024
If you just want to use Mudlet, you can skip these steps, and use one of the already ready (pre-compiled) installers ready for download.
Otherwise, hop in for new adventure!
Compiling
Compiling on Ubuntu
These instructions will get you setup compiling on Ubuntu. Need a hand? Join us on Mudlet's Discord or forums.
Ubuntu 22.04 & later
Following instructions will work on Ubuntu 22.04 as well as all its flavours and derivatives (such as KDE Neon, for example) Important thing is to have Universe repository enabled in your package manager. (on Ubuntu you will have all the repositories that you need already enabled by default.)
1. necessary dependencies
Majority of required dependencies can be obtained from repositories, and can be installed with following command:
 sudo apt install ubuntu-restricted-extras qtcreator build-essential git zlib1g-dev libhunspell-dev \
  libpcre3-dev libzip-dev libboost-dev libboost-all-dev libyajl-dev libpulse-dev libpugixml-dev \
  liblua5.1-0-dev lua-filesystem lua-zip lua-sql-sqlite3 luarocks ccache lua5.1 libsecret-1-dev \
  libglu1-mesa-dev mesa-common-dev libglib2.0-dev libgstreamer1.0-dev libqt5opengl5-dev cmake \
  qt6-multimedia-dev libqt6core5compat6 qt6-tools-dev qtkeychain-qt6-dev qt6-l10n-tools ninja-build \
  qt6-tools-dev-tools libqt6core5compat6-dev qttools5-dev qtmultimedia5-dev qt6-speech-dev
1.1 Ubuntu 24.04:
sudo apt install qt6-multimedia-dev
Few of required Lua modules are not available in official repositories, so they have to be installed using luarocks
 sudo luarocks install lcf
 sudo luarocks install luautf8
 sudo luarocks install lua-yajl
 sudo luarocks install lrexlib-pcre
2. obtaining the source code
Obtain the latest in-development code with:
 git clone --recursive -b development https://github.com/Mudlet/Mudlet.git
 mkdir Mudlet/build
 cd Mudlet/build
3. compiling the code
 cmake .. -G Ninja
 ninja
4. installing compiled code
After successful code compilation, next few commands will install resulting binaries, desktop file for menus and appropriate icon.
 sudo make install
 sudo cp ../mudlet.png /usr/share/pixmaps
 sudo cp ../mudlet.desktop /usr/share/applications
5. optional additional software
One of the major reasons for compiling Mudlet from source is the ability to unlock more features that are not enabled in official AppImage. Manual compilation will resolve the issues with sound by using system provided libraries, as well as enable more detailed theming of Mudlet application itself. However, do take note that Mudlet is a Qt based program, and that theming will not 'just work' in GTK based desktop environments (Gnome, XFCE, MATE, Budgie).
sudo apt install qt5ct
will install a tool for configuration of look and feel of Qt programs inside those desktop environments. Users of Qt based Desktop environments (KDE Plasma, LXQT) can simply use settings provided by environment itself.
Many of Qt widget styles and color schemes are available in official repositories, and will make Mudlet better.
6. Mudlet on Wayland
Mudlet compiled like this will run and work on Wayland, however, there are a few quirks with Keybidings (Numpad may not work as expected). Until that is resolved you may wish to start mudlet with:
QT_QPA_PLATFORM=xcb mudlet
(enter in terminal or simply change the Exec= line in /usr/share/applications/mudlet.desktop)
7. uninstallation
You can reverse the process described in this guide with following command:
sudo rm -fr /usr/bin/mudlet /usr/share/mudlet /usr/share/applications/mudlet.desktop /usr/share/pixmaps/mudlet.png
Other Ubuntu Versions
Most of the installation instructions for 22.04 should work for older versions as well. Of note is the required version of Qt, which is 5.14. If your used version of Ubuntu only supplies older Qt versions, have a look at Stephan Binners PPAs, which supplies a whole range of packages for different Ubuntu versions. Be sure to read the installation and usage instructions as Qt is installed to /opt and requires sourcing a script to set up.
Compiling on Chrome OS
These instructions will get you setup compiling on Chrome OS. Need a hand? Join us on Mudlet's Discord or forums.
1. Install dependencies
sudo apt install git build-essential \
  lua5.1 liblua5.1-0-dev libpcre3-dev libboost-dev zlib1g-dev cmake \
  libhunspell-dev lua-rex-pcre2 lua-sql-sqlite3 lua-filesystem lua-zip libyajl-dev \
  libzip-dev libglu1-mesa-dev ccache libpugixml-dev mesa-common-dev qtcreator \
  libpulse-dev libglib2.0-dev luarocks libboost-all-dev libsecret-1-dev \
  ninja-build libsecret-1-dev qt6-tools-dev qt6-5compat-dev qt6-multimedia-dev
sudo luarocks install luautf8
sudo luarocks install lua-yajl
3. Get Mudlet source
git clone --recursive https://github.com/Mudlet/Mudlet.git mudlet
4. Create a build directory
cd mudlet
mkdir build && cd build
5. Run the following command
cmake .. -G Ninja
then:
ninja -j 2
5. Start the application you have just compiled - enjoy
src/mudlet
Compiling on macOS
These instructions will get you setup compiling on macOS. Need a hand? Join us on Mudlet's Discord server or forums otherwise.
1. Install prerequisites
Install XCode, command line tools for XCode, and HomeBrew.
Once everything is installed, do:
 brew doctor
 brew update
 brew install git
2. Get Mudlet source
git clone --recursive https://github.com/Mudlet/Mudlet.git
3. Go to the parent of the mudlet "src" folder and create (if necessary) a build subdirectory (this is so that we can build out of source which keeps the source code clean)
cd Mudlet && mkdir build
3. Setup your environment
 ./CI/travis.osx.before_install.sh
 ./CI/travis.osx.install.sh
 luarocks config lua_version 5.1
 eval `luarocks path --lua-version=5.1`
For the following, one may have to add _DIR="/opt/homebrew/" such as PCRE_DIR="/opt/homebrew/" or ZIP_DIR="/opt/homebrew/" if the installation could not find header files.
 luarocks --lua-version=5.1 --lua-dir=`brew --prefix [email protected]` install lrexlib-pcre PCRE_DIR=`brew --prefix pcre`
 brew install sqlite
 luarocks --lua-version=5.1 --lua-dir=`brew --prefix [email protected]` install luasql-sqlite3 SQLITE_DIR=`brew --prefix sqlite`
 luarocks --lua-version=5.1 --lua-dir=`brew --prefix [email protected]` install luautf8
 luarocks --lua-version=5.1 --lua-dir=`brew --prefix [email protected]` install luafilesystem
 luarocks --lua-version=5.1 --lua-dir=`brew --prefix [email protected]` install lua-zip ZIP_DIR=`brew --prefix libzip`
brew install boost
OK to answer yes to delete files if prompted for the rm command above.
4. Run the following commands
 cd build
 cmake ../../Mudlet -DCMAKE_PREFIX_PATH=`brew --prefix qt5`
 make -j `sysctl -n hw.ncpu`
5. Enjoy
The mudlet.app is now available in src/ for launching:
open src/Mudlet.app
6. Qt Creator setup
No Lua installation is found, despite it existing on your system? Launch Qt Creator by doing open /Applications/Qt Creator.app (location depends on how you installed it).
Receiving a No rule to make target ... libQt5UiTools_debug.a error? A workaround is to symlink a file.
Mudlet in Qt Creator is not launching due to dyld: Symbol not found: __cg_jpeg_resync_to_restart? See here for a workaround.
7. (Optional) Discord Integration on ARM64
ARM64 binaries are not available libdiscord-rpc so you need to compile and combine it with the existing x86_64 binary into a universal binary.
git clone --single-branch --branch v3.3.0 https://github.com/discord/discord-rpc.git
cd discord-rpc
python build.py libs --shared
lipo ./builds/install/osx-dynamic/lib/libdiscord-rpc.dylib /path/to/existing/x86_64/libdiscord-rpc.dylib -output libdiscord-rpc.dylib -create
// verify that it's a universal binary:
otool -L libdiscord-rpc.dylib
// check it in to source control
8. Troubleshooting
If you exhaust all efforts to get YAJL to compile on your local system with homebrew, clone from the YAJL repository then ./configure && sudo make install.
Compiling on Debian
1. Install required packages from main repo.
sudo apt-get install build-essential git liblua5.1-0-dev zlib1g-dev libhunspell-dev libpcre3-dev \
libzip-dev libboost-dev libyajl-dev libpulse-dev libsecret-1-dev lua-rex-pcre2 lua-filesystem lua-zip \
lua-sql-sqlite3 qt5-qmake qtmultimedia5-dev qttools5-dev luarocks ccache libpugixml-dev
sudo luarocks install luautf8
sudo luarocks install lua-yajl
sudo luarocks install lrexlib-pcre
2. Grab latest Mudlet source.
mkdir ~/projects && cd ~/projects && git clone --recursive https://github.com/Mudlet/Mudlet.git mudlet
3. Build Mudlet.
cd ~/projects/mudlet/src
qmake
make
sudo make install
4. (Optional) Discord library
If you get the following error;
Could not find Discord library - searched in:
you need to specify the discord library in your build. Run the following, changing the path where necessary;
export LD_LIBRARY_PATH=$LD_LIBRARY_PATH:/home/user/mudlet-dev/Mudlet/3rdparty/discord/rpc/lib/
and recompile. You should see
Discord integration loaded. Using functions from: "libdiscord-rpc.so"
Compiling on Raspberry Pi OS
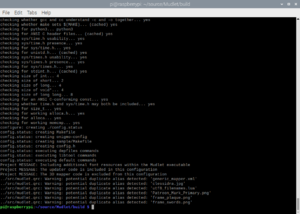
These instructions will get you compiling and running Mudlet on Raspberry Pi OS (Buster). Need a hand? Join us on Mudlet's Discord or forums.
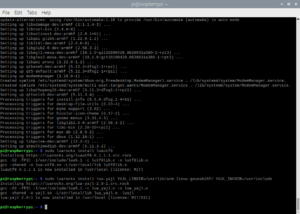
1.a Install apt dependencies
sudo apt-get update
sudo apt-get install build-essential git liblua5.1-dev zlib1g-dev libhunspell-dev libpcre3-dev \
  libzip-dev libboost-graph-dev libyajl-dev libpulse-dev lua-rex-pcre2 lua-filesystem lua-zip \
  lua-sql-sqlite3 qt5-assistant qtmultimedia5-dev qttools5-dev luarocks ccache libpugixml-dev cmake
1.b Install luarocks dependencies
sudo luarocks install luautf8
sudo luarocks install lrexlib-pcre
sudo luarocks install lua-yajl YAJL_LIBDIR=`find /usr -name "libyajl.so" -printf '%h\n'` YAJL_INCDIR=/usr/include
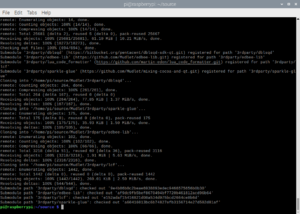
2. Get Mudlet source
mkdir ~/source && cd ~/source
git clone --recursive -b development https://github.com/Mudlet/Mudlet.git
3. Create a build directory
cd Mudlet && mkdir build && cd build
4. Run the following commands to build
WITH_UPDATER=NO WITH_3DMAPPER=NO qmake ../src/mudlet.pro
- If you get a response along the lines of:
qmake: could not find a Qt installation of
- then you likely have qtchooser present in your system that allows for both Qt4 and Qt5 (or more than one Qt5 version) and it modifiers qmake and some other Qt development programs to take an additional argument to specify which version to use. In that case you should use:
WITH_UPDATER=NO WITH_3DMAPPER=NO qmake -qt=qt5 ../src/mudlet.pro
THEN:
- For the fastest compile time while still being able to use the system at all (~35min on a RPi4 with 4GB of ram)
make -j $(expr `nproc` - 1)
OR:
- Use this if you have an older Raspberry Pi. Be prepared for it to take a while (over an hour) - it is not recommended to try to more than one compilation task at a time on the older systems with the -j option as they will only have a system memory with enough space for one of some of those tasks:
make
4. Install the application you have just compiled
sudo make install
5. Enjoy!
# mudlet is in the path, can just run it
mudlet
Compiling on Arch Linux
AUR Install and Compile
Mudlet is available in the Arch User Repository. (If the AUR has become unmaintained/orphaned, then skip below to Manual install.)
To install it use your favourite AUR helper (helper tool will automatically resove dependancies); example using yay :
yay -S mudlet
For more info on this process, visit Arch User Repository - ArchWiki.
Note: For the most recent development version of Mudlet, replace 'mudlet' with 'mudlet-git' in the above commands and proceed as described.
Built in fonts have been disabled, but are available in packages listed as optional dependancies.
Discord support in Mudlet depends on an external library provided by discord-rpc-api, which is also available in AUR, choose whichever variant suits you best.
Manual Install and Compile
These instructions will get you setup compiling on Arch. Need a hand? Join us on Mudlet's Discord or forums.
1. necessary dependencies
Majority of required dependencies can be obtained from repositories, and can be installed with following command:
 sudo pacman -S --needed cmake qt5-multimedia hunspell libzip lua51-filesystem qt5-gamepad lua51-luautf8 pugixml \
  ttf-font qtkeychain-qt5 boost qt5-tools ttf-bitstream-vera ttf-ubuntu-font-family noto-fonts-emoji glu luarocks
Few of required Lua modules are not available in official repositories, so they have to be installed using luarocks
 sudo lua5.1 /usr/bin/luarocks install lcf
 sudo lua5.1 /usr/bin/luarocks install luautf8
 sudo lua5.1 /usr/bin/luarocks install lua-yajl
 sudo lua5.1 /usr/bin/luarocks install lrexlib-pcre
 sudo lua5.1 /usr/bin/luarocks install luasql-sqlite3
 sudo lua5.1 /usr/bin/luarocks install lua-zip
There is an optional dependency for discord integration:
 git clone https://github.com/discord/discord-rpc
 cd discord-rpc
 mkdir build
 cd build
 cmake .. -DCMAKE_INSTALL_PREFIX=/usr
 sudo cmake --build . --config Release --target install
2. obtaining the source code
Obtain the latest in-development code with:
 git clone --recursive -b development https://github.com/Mudlet/Mudlet.git
 mkdir Mudlet/build
 cd Mudlet/build
3. compiling the code
There below are two ways to build with qmake, the first is for general use, the second is for developers:
qmake ../src/mudlet.pro
*OR*
qmake CONFIG+=debug ../src/mudlet.pro
Now finish compiling:
make -j `nproc`
4. installing compiled code
After successful code compilation, next few commands will install resulting binaries, desktop file for menus and appropriate icon.
 sudo make install
 sudo cp ../mudlet.png /usr/share/pixmaps
 sudo cp ../mudlet.desktop /usr/share/applications
5. optional additional software
One of the major reasons for compiling Mudlet from source is the ability to unlock more features that are not enabled in official AppImage. Manual compilation will resolve the issues with sound by using system provided libraries, as well as enable more detailed theming of Mudlet application itself. However, do take note that Mudlet is a Qt based program, and that theming will not 'just work' in GTK based desktop environments (Gnome, XFCE, MATE, Budgie).
sudo pacman -S install qt5ct
will install a tool for configuration of look and feel of Qt programs inside those desktop environments.↵Users of Qt based Desktop environments (KDE Plasma, LXQT) can simply use settings provided by environment itself.
Many of Qt widget styles and color schemes are available in official repositories, and will make Mudlet better.
6. Mudlet on Wayland
Mudlet compiled like this will run and work on Wayland, however, there are a few quirks with Keybindings (Numpad may not work as expected). Until that is resolved you may wish to start mudlet with:
QT_QPA_PLATFORM=xcb mudlet
(enter in terminal or simply change the Exec= line in /usr/share/applications/mudlet.desktop)
7. uninstallation
You can reverse the process described in this guide with following command:
sudo rm -fr /usr/bin/mudlet /usr/share/mudlet /usr/share/applications/mudlet.desktop /usr/share/pixmaps/mudlet.png
Compiling on Fedora (aarch64)
1. Install dependencies
sudo dnf groupinstall "Development Tools" "Development Libraries"
sudo dnf install compat-lua compat-lua-devel compat-lua-libs hunspell-devel lua5.1-filesystem luarocks pugixml-devel qtkeychain-qt5-devel bitstream-vera-fonts-all ccache qt-creator qt5-qtmultimedia-devel qt5-qtgamepad-devel yajl-devel qtchooser qt5-qttools-devel qt5-qttools-static zziplib-devel pcre-devel libzip-devel sqlite-devel
sudo luarocks --lua-version 5.1 --tree=/usr install luazip
sudo luarocks --lua-version 5.1 --tree=/usr install luasql-sqlite3
sudo luarocks --lua-version 5.1 --tree=/usr install lcf
sudo luarocks --lua-version 5.1 --tree=/usr install luautf8
sudo luarocks --lua-version 5.1 --tree=/usr install lua-yajl
sudo luarocks --lua-version 5.1 --tree=/usr install lrexlib-pcre
In your user's home directory:
If you use a bash shell:
luarocks --lua-version 5.1 path --no-bin >> .bashenv
source .bashenv
If you use a zsh shell:
luarocks --lua-version 5.1 path --no-bin >> .zshenv
source .zshenv
If you use a csh shell:
luarocks --lua-version 5.1 path --no-bin >> .cshenv
source .cshenv
This should cover paths, but you may want to reboot to be sure.
2. Obtain the source code
git clone --recursive --branch=development https://github.com/Mudlet/Mudlet.git
mkdir Mudlet/build
cd Mudlet/src
3. Make necessary compiling instruction adjustments
Edit mudlet.pro - find these lines in mudlet.pro and make the following changes:
    linux {
        LIBS += \
            -llua5.1 \
            -lhunspell
        INCLUDEPATH += /usr/include/lua5.1
    }
We're adding a - between lua and 5.1 and adding -1.7 to hunspell under LIBS so that it becomes this:
    linux {
        LIBS += \
            -llua-5.1 \
            -lhunspell-1.7
        INCLUDEPATH += /usr/include/lua5.1
    }
Save and exit.
4. Compile
cd ../build
Run this in the build directory:
WITH_FONTS=NO WITH_OWN_QTKEYCHAIN=NO WITH_UPDATER=NO WITH_VARIABLE_SPLASH_SCREEN=NO XDG_DATA_DIRS=/usr/share qmake-qt5 PREFIX=/usr INCLUDEPATH+=/usr/include/lua-5.1 LUA_SEARCH_OUT=lua-5.1 ../src/mudlet.pro
An explanation of the qmake arguments -- we're passing these environment variables to mudlet.pro:
WITH_FONTS=NO WITH_OWN_KEYCHAIN=NO WITH_UPDATER=NO WITH_VARIABLE_SPLASH_SCREEN=NO XDG_DATA_DIRS=/usr/share
Adding build variables to mudlet.pro so that it finds the correct libraries:
PREFIX=/usr INCLUDEPATH+=/usr/include/lua-5.1
And finally adding a build variable to translations/translated/updateqm.pri so that it uses the correct version of the Lua compiler (Fedora also comes with 5.4) to generate translation statistics.
LUA_SEARCH_OUT=lua-5.1
Once complete, run the following:
If you have time to kill (About 10 minutes on an Apple M1 Max in Fedora):
make
If you want it done as fast as possible(Less than a minute on an Apple M1 Max in Fedora):
make -j `nproc`
Or if you want something in between, make -j `nproc` tells it to use all available processor cores. If you want to use a specific number instead (ie 2), you can use:
make -j 2
5. Install
sudo make install
sudo cp ../mudlet.png /usr/share/pixmaps
sudo cp ../mudlet.desktop /usr/share/applications
6. Hang onto the cloned git repo If you need to uninstall, you can go back into the /build directory and 'sudo make uninstall'.
Compiling on Gentoo
An overlay containing Mudlet is available for compiling Mudlet on Gentoo.
Compiling on Windows
- Install MSYS2: https://www.msys2.org
- At the end of installation uncheck run msys2 now and click finish
- Run MSYS2 MINGW64 from the start menu
- Run the following in the opened MSYS2 terminal (you right-click in order to paste):
pacman --files --refresh
pacman --sync git mingw-w64-x86_64-qt-creator mingw-w64-x86_64-cmake mingw-w64-x86_64-ninja mingw-w64-x86_64-clang-libs --noconfirm
- Run the following from the MSYS2 terminal:
git clone --recursive -b development https://github.com/Mudlet/Mudlet.git
- Setup the development environment (~5-10min) by running:
./Mudlet/CI/setup-windows-sdk.sh
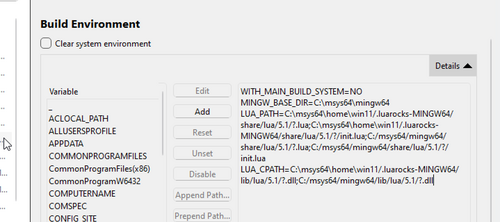
Take note of the message at the end to add the variables to your environment once you have opened the project in Qt Creator. (WITH_MAIN_BUILD_SYSTEM, MINGW_BASE_DIR, LUA_PATH, LUA_CPATH)
![]() Note: This might not work on windows arm64, pacman freezes.
Note: This might not work on windows arm64, pacman freezes.
- Open Qt Creator. You will need to open it via MSYS2 every time:
/mingw64/bin/qtcreator.exe
- Press link with Qt on the bottom right of Qt Creator
- Choose
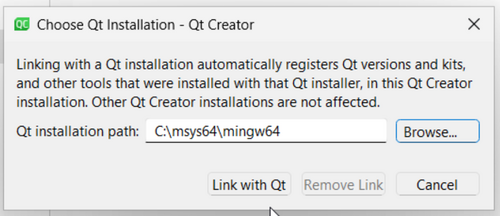
C:/msys64/mingw64as the location then restart Qt Creator
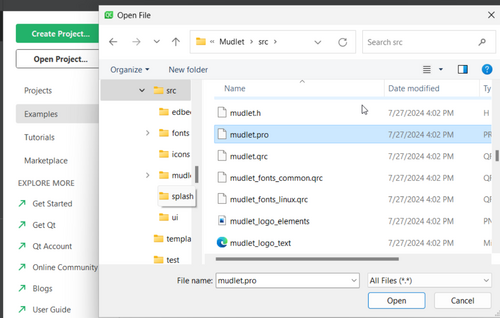
- Open project; C:/msys64/home/<user>/Mudlet/src/mudlet.pro
- In Build Environment details, set environment variables to what was stated in the sdk-setup script above.
- Build Mudlet (Ctrl+B)
- Run Mudlet (Ctrl+R)
Contributing changes
Once you're all done with your changes, contribute them to Mudlet using a pull request. Thanks for improving open-source!
Compiling on Github Codespaces
Github Codespaces allow you to code and run Mudlet all from the browser - makes it a lot easier to get started. It also allows you to code Mudlet itself from any computer in the world!
1. Create a new codespace
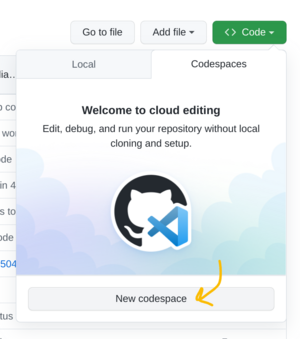
Create a new Codespace by going to https://github.com/Mudlet/Mudlet using Google Chrome or Microsoft Edge (Firefox at the time of the writing doesn't have working copy/paste). There, click the green "Code" button, select the "Codespaces" tab and click "New codespace".
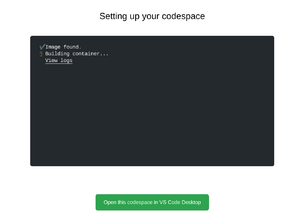
2. Wait for it to load
This will take a while (~5min) so grab a tea:
3. Connect to the environment
Go to the Ports section at the bottom and change the Port Privacy of the Open Mudlet port to Public:
Then connect to your online Linux desktop with mudlet as the password by clicking on the web icon.
In case it can't connect, make sure the port privacy is set to Public. If it still can't connect, try 4-5 more times - eventually it'll work.
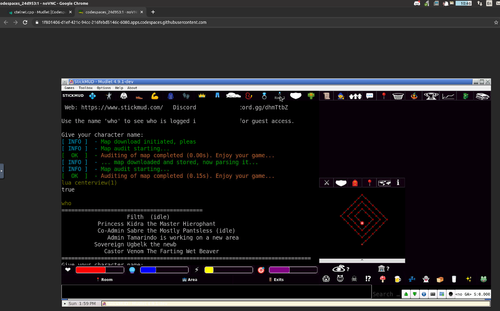
We chose a retro 90's look here to fit with the whole hacking theme, so if you see this you're good 😉
4. Build Mudlet
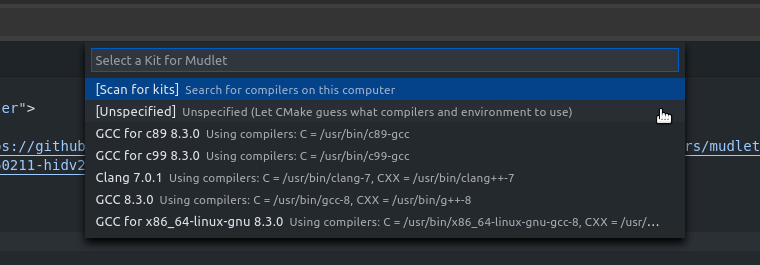
In Codespaces, hit F7 and select Let CMake guess...
It will then start building Mudlet automatically. Using the Basic instance (only kind available in beta) the first-time build will take ~25min, so take a break here - you've made excellent progress. All follow-up compiles after this will be quicker, by the way.
5. Run Mudlet
Hit the little play button at the bottom of the screen, and Mudlet will now launch in the remote connection tab. Not working? We can help. Otherwise, enjoy!
Note: When the codespace is unused for a while, it will disconnect. It'll never disconnect while you're actively using it. See Github issue for details.
Developing with Docker
Docker is a system designed for more reproducible and isolated builds. A docker setup exists and has been tested using Pop OS! 20.04 (which is derived from Ubuntu 20.04). First, follow the instructions to install both docker and docker-compose.
Clone the development branch
 git clone --recursive -b development https://github.com/Mudlet/Mudlet.git
 cd Mudlet/docker
Make a local copy of the .env.template file:
cp .env.template .env
If you wish to customize things like the number of cores to use for building mudlet, feel free to change the corresponding values in the .env file.
To run Qt-Creator and develop Mudlet, run docker-compose up dev.
To run Mudlet, run docker-compose up mudlet. Note: At the moment, the mudlet build will not persist settings past container rebuilds.
Setting up IDEs
CLion
Qt not detected
If you'd like to use CLion and it is giving the following error:
    By not providing "FindQt5Core.cmake" in CMAKE_MODULE_PATH this project has
    asked CMake to find a package configuration file provided by "Qt5Core", but
    CMake did not find one.

    ...
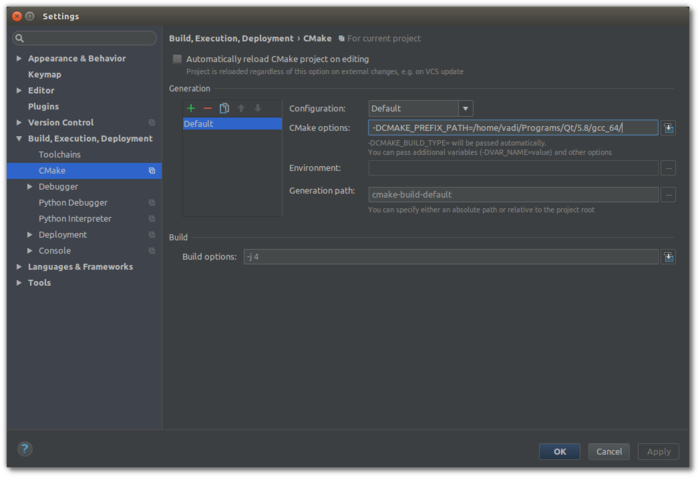
You can fix this by setting -DCMAKE_PREFIX_PATH=<your Qt + version + compiler location>. For example: -DCMAKE_PREFIX_PATH=/media/vadi/SSDer/Programs/Qt/5.14.2/gcc_64/
CLion setup on Windows
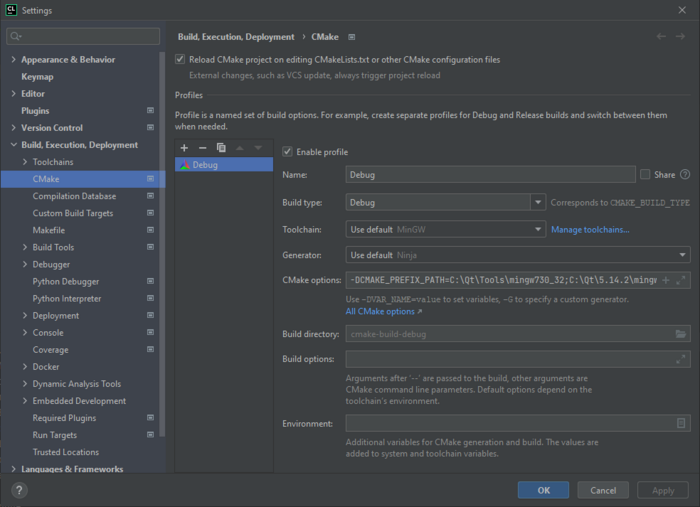
After running setup-windows-sdk.ps1 make sure to set Cmake options to:
-DCMAKE_PREFIX_PATH=C:\Qt\Tools\mingw730_32;C:\Qt\5.14.2\mingw73_32 -DBoost_INCLUDE_DIR=C:\Libraries\boost_1_77_0
Directories might vary slightly, when different Qt, Boost or MinGW version will be used.
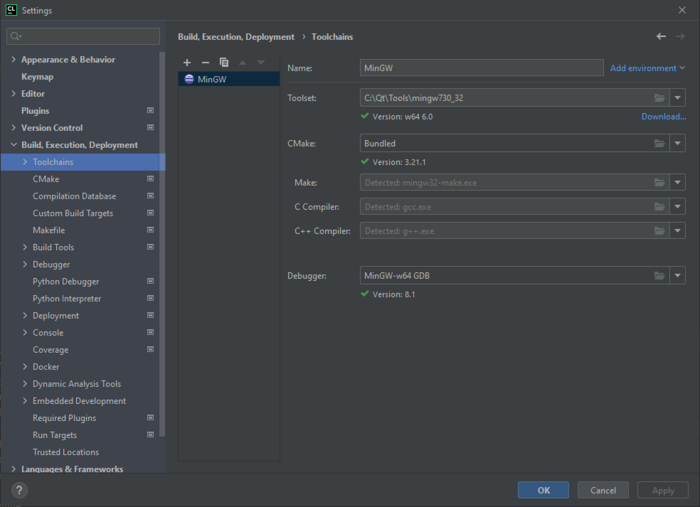
You will need 32 bit version of MinGW. Set it in the Toolset field to:
C:\Qt\Tools\mingw730_32
Directory may be slightly different if MinGW version used will change.
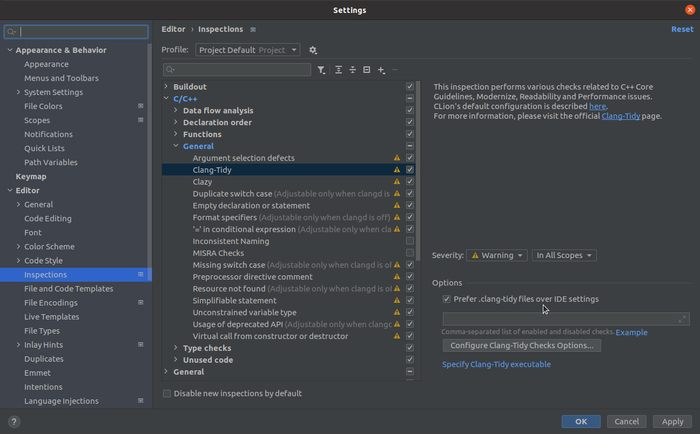
Clang Tidy
Ensure that CLion is set to run the project's .clang-tidy checks with the Prefer .clang-tidy files over IDE settings option:
This helps us catch any issues just a bit earlier.
Checking memory leaks & other issues (sanitizers)
Besides clang-tidy, it's also possible to enable clang sanitizers to double-check for issues:
- LeakSanitizer for detecting memory leaks
- AddressSanitizer for detecting most issues dealing with memory, such as out of bounds accesses to heap, stack, global and more
- UndefinedBehaviourSanitizer for detecting the use of various features of C/C++ that are explicitly listed as resulting in undefined behaviour (such as using misaligned or null pointer, conversion to, from, or between floating-point types which would overflow the destination, division by zero, etc)
- MemorySanitizer for detecting reading uninitialised memory
- ThreadSanitizer for detecting threading issues
To use the sanitisers, set the USE_SANITIZER CMake variable to one or several variables (separate by comma): Address, Memory, MemoryWithOrigins, Undefined, Thread, or Leak
To use them in CLion, adjust the CMake settings:
Not all sanitisers can be used with each other - in that case the cmake configuration won't allow you to continue.
Clang Format
Ensure that CLion is set to use the .clang-format formatting style:
This helps keep the look'n'feel of the source code in a consistent manner, even with many people contributing to Mudlet.
Visual Studio Code
To set the path in Visual Studio Code, open settings, search for cmake environment and set the CMAKE_PREFIX_PATH to your path, such as /home/vadi/Programs/Qt/5.15.2/gcc_64:
Clang Tidy
clang-tidy catches common programming issues, run it by selecting 'Analysis' from the command palette (Ctrl+Shift+P by default):
It is also possible check status of analysis and cancel if needed.
Checking memory leaks & other issues (sanitizers)
Besides clang-tidy, it's also possible to enable clang sanitizers to double-check for issues:
- LeakSanitizer for detecting memory leaks
- AddressSanitizer for detecting most issues dealing with memory, such as out of bounds accesses to heap, stack, global and more
- UndefinedBehaviourSanitizer for detecting the use of various features of C/C++ that are explicitly listed as resulting in undefined behaviour (such as using misaligned or null pointer, conversion to, from, or between floating-point types which would overflow the destination, division by zero, etc)
- MemorySanitizer for detecting reading uninitialised memory
- ThreadSanitizer for detecting threading issues
To use the sanitisers, set the USE_SANITIZER CMake variable to one or several variables (separate by comma): Address, Memory, MemoryWithOrigins, Undefined, Thread, or Leak
To use them in VSCode, set the cmake.configureSettings variable:
Not all sanitisers can be used with each other - in that case the cmake configuration won't allow you to continue.
Qt Creator
Clang Tidy and Clazy
Configure Mudlet-specific checks for clang-tidy and clazy tools help catch any issues early on. See Qt Creator's instructions for setting this up - clang-tidy can use the .clang-tidy file that's available at the root of the repository, and for clazy enable level0 and level1 checks.
Checking memory leaks & other issues (sanitizers)
Besides clang-tidy, it's also possible to enable clang sanitizers to double-check for issues:
- LeakSanitizer for detecting memory leaks
- AddressSanitizer for detecting most issues dealing with memory, such as out of bounds accesses to heap, stack, global and more
- UndefinedBehaviourSanitizer for detecting the use of various features of C/C++ that are explicitly listed as resulting in undefined behaviour (such as using misaligned or null pointer, conversion to, from, or between floating-point types which would overflow the destination, division by zero, etc)
- MemorySanitizer for detecting reading uninitialised memory
- ThreadSanitizer for detecting threading issues
To use the sanitisers, set the USE_SANITIZER CMake variable to one or several variables (separate by comma): Address, Memory, MemoryWithOrigins, Undefined, Thread, or Leak
To use them in Qt creator, head to Projects - Build:
Not all sanitisers can be used with each other - in that case the cmake configuration won't allow you to continue.
Clang Format
Ensure that Qt Creator is set to use the .clang-format formatting style in the C++ settings. Turn on Format instead of indenting for Ctrl+I to format code, and ensure Override Clang Format configuration file is disabled:
This helps keep the look'n'feel of the source code in a consistent manner, even with many people contributing to Mudlet.
Building with multiple versions of Lua
Mudlet uses Lua 5.1 only, so if you are compiling on a system that also has later versions installed, you might get the following error: ‘LUA_GLOBALSINDEX’ was not declared in this scope.
To fix this, pass the path to Lua headers explicitly. For CMake: -DLUA_INCLUDE_DIR=/usr/include/lua5.1 (adjust as needed).
Key contributing information
Clang format is used to automatically format code submissions using the src/.clang-format style. See here how to enable clang-format with Qt Creator - and make sure to specify the 'File' option for the configuration style.
Branches:
development is the development branch where new features can go.
Workflow:
Fork and submit a PR with your changes (Github tutorial).
Here is a list of package versions delivered with different Linux distros. You may want to upgrade these: https://repology.org/project/mudlet/versions
Lua & Luarocks
Mudlet includes a Lua (version 5.1) scripting system for the end-user, which you, as a reader of this Wiki, may already be aware of! If not, you might wish to (after you have got your hands on a working Mudlet) take a look at Mudlet Lua API as that is the recommended place to find out the details of all the functions that Mudlet provides on top of the core Lua functionality.
Some of that ability comes from extra code that is not built-in to Lua but is in the form of external modules either in the form of script (text) files written in the Lua language itself or binary (library) files compiled from (usually but not exclusively 'C') source code. In order to have that functionality Mudlet makes use of several of these modules which can most readily (if not already available as "packages" for a particular Operating System) be obtained as rocks from the public Luarocks collection. Such a rock actually consists of a rockspec file that gives instructions to the Luarocks tool how to obtains the (source) code, compile it on any supported OS into the form that a Lua interpreter (including the one included in each running Mudlet profile) can use, and where and what it will be placed and called when it has been made. After that it should be available to Lua via the require command.
Anyone compiling Mudlet for themselves will find it desirable to ensure they have a usable Luarocks installation and have the lua-yajl module installed before commencing to compile Mudlet itself; this is because a Lua (version 5.1) interpreter and that module are used within the build process of making the executable code that is the Mudlet application.
Included Modules
- luautf8 (manual in README)
- lcf (customised version)
- luafilesystem (manual)
- lrexlib-pcre (manual)
- luasql-sqlite3 (http://lunarmodules.github.io/luasql/manual.html manual)
- lua-yajl (manual in README)
- luazip (manual)
Adding Luarocks
Here's a rundown on checking you can use luarocks. Here we will use the bit32 module as an example.
1. Install via luarocks
> luarocks install bit32
2. Check where luarocks installs the modules. Note the modules section.
> luarocks show bit32

bit32 5.3.5.1-1 - Lua 5.2 bit manipulation library

bit32 is the native Lua 5.2 bit manipulation library, in the version from Lua 5.3; it is compatible with Lua 5.1, 5.2, 5.3 and 5.4.

License:        MIT
Homepage:       http://www.lua.org/manual/5.2/manual.html#6.7
Installed in:   /usr/local

Modules:
        bit32 (/usr/local/lib/lua/5.1/bit32.so)

Depends on:
        lua >= 5.1, < 5.5 (using 5.1-1)
3. Recompile mudlet. You may need to adjust lua path and cpath information for your environment. You can use the following commands to help find this information.
> luarocks --lua-version 5.1 path --no-bin
export LUA_PATH='./?.lua;/usr/local/share/lua/5.1/?.lua;/usr/local/share/lua/5.1/?/init.lua;/usr/local/lib/lua/5.1/?.lua;/usr/local/lib/lua/5.1/?/init.lua;/usr/share/lua/5.1/?.lua;/usr/share/lua/5.1/?/init.lua;/home/username/.luarocks/share/lua/5.1/?.lua;/home/username/.luarocks/share/lua/5.1/?/init.lua'
export LUA_CPATH='./?.so;/usr/local/lib/lua/5.1/?.so;/usr/lib/x86_64-linux-gnu/lua/5.1/?.so;/usr/lib/lua/5.1/?.so;/usr/local/lib/lua/5.1/loadall.so;/home/username/.luarocks/lib/lua/5.1/?.so
Or from within mudlet itself you can issue these commands to double check the correct paths are being used.
> lua print(package.path)
/home/username/.config/mudlet/profiles/localhost/?.lua;/home/zooka/.config/mudlet/profiles/localhost/?/init.lua;./?.lua;/usr/local/share/lua/5.1/?.lua;/usr/local/share/lua/5.1/?/init.lua;/usr/local/lib/lua/5.1/?.lua;/usr/local/lib/lua/5.1/?/init.lua;/usr/share/lua/5.1/?.lua;/usr/share/lua/5.1/?/init.lua;/home/username/.luarocks/share/lua/5.1/?.lua;/home/username/.luarocks/share/lua/5.1/?/init.lua

> lua print(package.cpath)
/home/username/.config/mudlet/profiles/localhost/?.so;/home/username/Workspace/mudlet-dev/Mudlet/build/lib/?.so;./?.so;/usr/local/lib/lua/5.1/?.so;/usr/lib/x86_64-linux-gnu/lua/5.1/?.so;/usr/lib/lua/5.1/?.so;/usr/local/lib/lua/5.1/loadall.so;/home/username/.luarocks/lib/lua/5.1/?.so
4. Recompile and run a test script using the require command to load in the necessary library.
bit32 = require("bit32")

function bit32_test()
  bit32.band(0,1)
end
Enabling Debug Build
To enable a debug build that can be run through GDB:
- follow all steps until qmake
- modify the qmake line by adding in debug info, e.g.:
qmake CONFIG+=debug ../src/mudlet.pro
- compile as normal
- attach gdb to mudlet
gdb ./mudlet
- within gdb command line start mudlet running by:
run
- proceed to crash mudlet then type
bt
- submit the output with your bug reports.
Compile Time Flags
DEBUG_UTF8_PROCESSING - for decoding the UTF-8 (1 byte with the MSB set or 2, 3 or 4 bytes) encoding
DEBUG_GB_PROCESSING - for decoding the GBK (2 bytes) or GB18030 (2 or 4 bytes) encodiing
DEBUG_BIG5_PROCESSING - for decoding the Big5-ETEN or Big5-HKSCS encodings
DEBUG_EUC_KR_PROCESSING - for decoding the EUC_KR encoding
DEBUG_SGR_PROCESSING - decoding the <ESC>[ codes (that pair of bytes being the CSI "Control Sequence Introducer" - including the one ending in m which is the "Set Graphics Rendition" that Mudlet (and other MUD clients and other things) use to control colours and other font effects.
DEBUG_OSC_PROCESSING - decode the <ESC>] codes (that MUST end with a <ESC>\) - currently Mudlet only handles a couple of these OSC "Operating System Commands".
DEBUG_MXP_PROCESSING - stuff to do with the MXP protocol - which uses a <ESC> ... z sequence of characters to do some things...
